

Concealed carry guns are a great thing to have around.
Having this sort of tactical survival gear on you at all times is a smart idea.
But we think you can amp up your survival strategy even further.
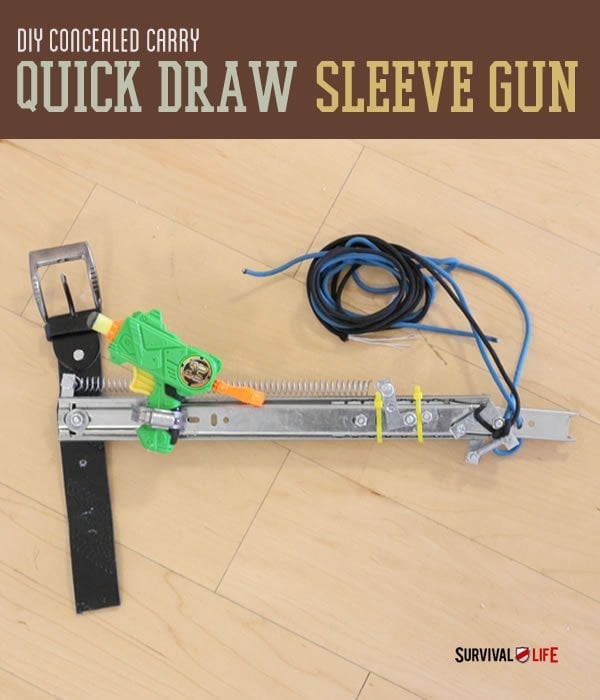
Check out this crazy cool homemade gun sleeve for the ultimate quick draw concealed carry experience.
Whether for fun or extreme tactical use, you’ll have a blast making this project.
Check out the complete instructions from our friends at DIY Ready for this cool DIY !

Ever wish you had a gun hidden up your sleeve, something like the quick-draw sleeve gun from “Taxi Driver”?
You are in luck. We wanted one, too!
Using some slick tricks with a drawer slide, we show you how to make your own DIY version of this cool secret weapon.
What is a sleeve gun, anyway?
A sleeve gun is a device wrapped around a user’s forearm and used to conceal a small firearm under a long-sleeved coat or jacket. A trigger mechanism causes the gun to extend out of your gadget quickly enough for you to grab it and fire.
NOTE: This project was designed for use with an airsoft gun. The responsibility of how the remote control gun is used rests with the builder of the project. Survival Life is not responsible or liable in way for the way you use the information found on our site.
Need some other stealth ideas and tips?
Check out this cool spy course by Jason Hanson:
Spy Escape and Evasion
This video shows you the sleeve gun in action:
How To Make A Sleeve Gun | Instructions
Supplies You Need For This Project:
- 1 14″ Ball-Bearing Drawer Slide
- Belt
- 4-inch Hose Clamp
- Regular Pliers
- Needle Nose Pliers
- Hammer
- 2 Small Zipties
- 4 L-Shaped Mending Brackets (1 and 1/2-inch)
- A 5/32″ x 4-1/2″ x .041″ Extension Spring
- A 1.375″ x 0.437″ x 0.041″ Extension Spring
- 3″ x 1″ Machine Screws with Nuts (#12-#24 or smaller)
- 4″ x 1-1/2″ Machine Screws with 10 matching Nuts (#12-#24 or smaller)
- 2″ x 1/2″ Flat Headed Screws with Nuts (#12-24 or smaller)
- 2″ x 1/2″ Machine Screws with Nuts (#12-24 or smaller)
- Paracord or Other Strong String
- Drill
- Tin Snips
- Rotary Tool
- Bolt Cutters
Step 1: Get a ball-bearing drawer slide
First, buy an inexpensive ball-bearing drawer slide from any hardware store. Ball-bearing drawer slides are more expensive than the kinds that use plastic wheels, but they are necessary for this project. We got ours for $10 from the big box hardware store.

Step 2: Begin disassembling the slide
Take your drawer slide and find the end with the stop that has a rubber casing.

With a pair of pliers, remove the rubber casing and bend the stop open.


Step 3: Preparing one end of your newly disassembled slide
Once you’ve bent the stop, extend the drawer slide and it will separate into two metal components. We will be working with the smaller one. The smaller segment also has a stop in the form of two metal prongs that bend upward. We need to flatten these out so that we can disassemble the slide into its smaller components. Place your pliers on top of the prongs and strike them with a hammer to flatten them. We used another pair of pliers instead of a hammer because we were too lazy to walk three feet to our tool box. Whatever, it worked fine.


Step 4: Take out your balls
When the stops have been flattened, you will be able to slide the rail apart, and this will expose the ball-bearing component. Slide this out of the rail, but be careful not to lose any of the ball-bearings.


Place the ball-bearings in a small container.

Step 5 : Cut the sliding component of your DIY concealed carry holster
With a Sharpie, mark the ball-bearing component as shown and cut it with a bolt cutter to around 4-inches in length. You could also use a hacksaw or a metal blade-equipped power saw, but it isn’t necessary. Cutting this component will add more space for your concealed weapon to hide within your sleeve.


If you bend any of the ball-bearing “arms” in the process, bend them back into place with needle nose pliers.

Step 6: Drill the slide component
Drill two holes in the ball-bearing component, one on each end. They do not need to be equidistant, so you can just eyeball it. Clamps and a piece of scrap wood come in handy at this point.


Step 7: Cut the rail
Cut the rail from which you pulled this slide to the proper length with the bolt cutters. The total length will be based on the length of your arm from the elbow to the wrist. For us that worked out to 12-inches. Cut it right next to the section of rail that has pre-drilled holes.

Before you cut it, flip the rail over and remove the piece of plastic from the other side.


Step 8: Mark & drill the slide connection
Place the ball-bearing slide at one end of the rail and use a Sharpie to mark the rail where the holes are.

Drill holes where you’ve just marked the rail. Begin the hole by using a small bit, and then move up to a bigger size to accommodate your screws later.


Step 9: Affix your first bolts & brackets
Slide a 1/2″ bolt through the hole you’ve just drilled. The thickness doesn’t mater so long as the bolt head does not extend beyond the top edges of the rail.

Place an L-shaped 1 and 1/2-inch mending plate over the other side.

Secure the L-shaped mending plate with a nut.
 *Note: If you need to make the holes on the L-shaped mending plate bigger to match the size of your screws, you can do so by clamping the bracket to a piece of wood and drilling it out with a drill bit.

Step 10: Mount the slider to the rail
Take two 1/2″ small screws with flat heads. We used two screws that were lying around; they aren’t even the same type. The important thing is that the heads are low profile, to provide clearance for the ball-bearing section to slide along the rail unobstructed.

Place one of the screws through one of the holes in the ball-bearing section.


Flip it over and secure the screw with a nut.

Step 11: Repeat
Repeat this process for the other screw.


Step 12: Cut the notch that will lock your slider in place
With a Sharpie, draw a small notch shape on the ball-bearing section similar to one in the picture. It’s basically a small U right near the edge. We’re going to cut this shape away from the metal.


You can use a drill to cut out a majority of the shape. Begin with a small bit, and then repeat with a larger one.


If you have tin snips, you can use them to cut the rest of the metal away.


Step 13: Clean up your notch cut
Once you’ve done most of the damage with the drill and the tin snips, you can make smaller adjustments with a rotary tool and a metal grinding attachment.


Step 14: Gather your balls
After you’ve made the cuts, replace the ball-bearing slider back into the rail by inserting one ball at a time. Replace the slider “cut-end” first.


Step 15: Secure the rail back into place
Once the slide is in the rail, secure it with two small zipties. This is so that the ball-bearing section doesn’t get pried out of its housing, causing the ball-bearings to spill everywhere! Keep the zipties loose enough that the ball-bearing section will still slide.


Snip the ziptie excess off with scissors or your needle nose pliers.


Step 16: Grab your belt
Take an old belt and cut it to about one foot in length from the buckle section like below.

Step 17: Drill and bolt your belt
Roughly 3-inches down from where the buckle begins, use your drill to make a hole in the strap.

Place a washer over the hole on the inside of the belt.

Insert a 1″ bolt through the washer and through the strap.

Step 18: Keep reinforcing the belt system
On the other side of the belt (the outside), place another one of your 1 and 1/2-inch L-shaped mending plates over the bolt as shown.

Stick the bolt through the pre-existing cutout on the end of the rail and place a washer over it as shown.

Step 19: Secure
Secure all of these pieces tightly by fastening a washer over the bolt. The L-shaped mending plate should align with the rail in such a way that one of the arms runs parallel to the rail.

Step 20: Attach your first spring
Place a 2″ bolt through the hole in this arm and slip one end of the larger compression springs over it.

Secure the spring to the bolt with a nut.

Step 21 – Begin building the trigger component
Slide a 2″ screw through one of the pre-existing holes in the cut-off piece that you’ve set aside. Place it as shown. At the edge, place a 1″ screw through the pre-existing hole at the end but facing in the other direction.

Secure the 2″ screw with a nut.

Step 22: Preparing for another bracket
On the 1″ screw, place another nut and screw it halfway down the bolt. You’re going to place another 1 and 1/2-inch L-shaped mending bracket over this bolt in a couple of steps.

Step 23: Mount this to the rail
Now place the shorter bolt in the pre-existing cut out section at the back end of the rail. It should come out the side opposite the sliding component.

Place a washer over the screw.

Step 24: Add your mending backet
Place your L-shaped mending bracket over the washer.

Place a nut over the bolt to secure it into place.

Place a 2″ machine screw through the L-Shaped mending bracket and secure it with a nut.

Step 25: Final bracket
On the top-side of the rail (the side with the moving slide), place yet another 1 and 1/2-inch L-shaped mending bracket over the 2″ screw as shown and secure it with a nut. Place a 1/2″ screw through the L-shaped mending plate in one of the arms as shown.

Step 26: Springing the trigger
On the same L-shaped mending bracket, place a 1/2″ screw on the other arm, and connect the two L-shaped brackets with a small spring.

Step 27: Springing the slide
Place a 2″ screw through the L-shaped mending bracket on the moving slide.

Secure it with a nut.

Place the other end of the big compression spring over it.

Step 28: Don’t lose your springs…
Need more super stealth ideas and tips?Check out Spy EscapeFind the rest of the steps and video instructions and other cool DIY on DIY Ready.Want more badass gun projects, check out these posts:How to Make A DIY Remote Controlled GunDIY Remote Controlled Home SecurityHow To Use A Picture Frame For Hidden Gun StorageLike this post?Be sure to like us on Facebook so you can be the first to know about latest survival tips and off the grid living skills.