

We just made an amazing remote control gun you have to check out. You’ve never seen anything quite like it.
You build this surprisingly inexpensive home security device with bike gears and cables to create a manual pulley system that really works.
You can operate this gun from afar, unseen by any lurking threats.
Check out the video to see how this remote control gun works:
http://youtu.be/Yo3YTJ48ckw
What do you think?
We think it is super stealth and could not believe how inexpensive it was to make a DIY security system of this caliber. All the parts should be readily available at any local retailer, and the camera we use is just an ordinary video camera.
Nothing fancy here, just 007 cool.
Want to be like 007?
Check out this cool spy product
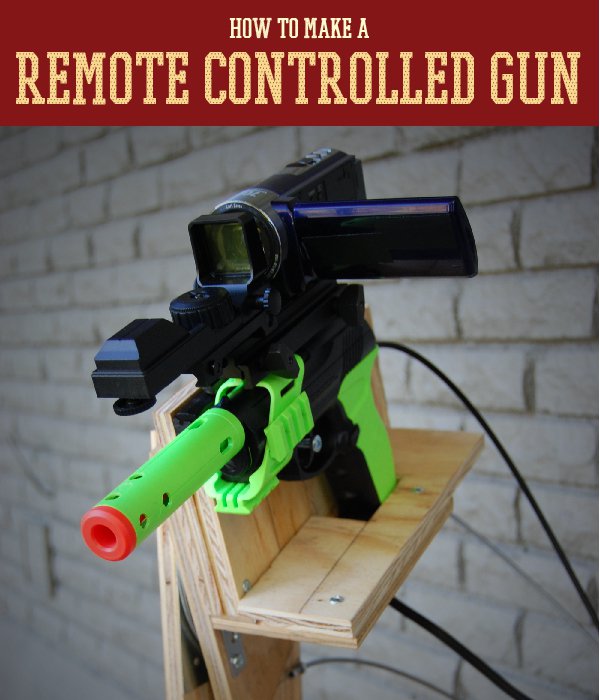
How To Make A Remote Control Gun
To make this project, we started with our DIY remote control camera project. If you have not seen the remote control camera, check it out here.
We’re going to use the same motion control base that we’ve built for the remote control camera in the previous tutorial. First, remove your camera so that you can replace it with an airsoft gun or firearm.
NOTE: This project was designed for use with an airsoft gun. The responsibility of how the remote control gun is used rests with the builder of the project. Survival Life is not responsible or liable in way for the way you use the information found on our site.

Supplies You Will Need To Make A Remote Control Gun:
- 1 Existing control motion base (from remote control camera tutorial)
- 1 Airsoft or firearm pistol with a quad rail mount (For this project to work, it is important that your gun has a quad rail mount.)
- 1 Rifle Sling Mount
- 1 Scope Rail Mount
- 1 Scope
- 1 Camera
- 1 TV
- 1 Bicycle Brake
- 1/2″ Plywood
- 1 Drill
- 1 Phillips Head Screwdriver
- 1 Saw
- 1 5mm or 3/16 drill bit
- 1 surface mount bolt
- 1 x #10-32 1-¼” screw
- 4 x #10 ¾” screws
- 3 x #10 1-¼” screws
- 2 x #2 1-¼” screws
- 5x30mm Hex bolt1 Small compression spring
- 1 x medium eyelet
- 1x small eyelet
- 1 x 20′ Bicycle brake cable and cable housing
- 2 cable stops
- 1/2″ Metal Pipe
- 1/2″ Mounting Flange
- 1/2″ Cap
- Electrical Tape
I. Attach the gun to the motion control platform
Step 1:
With the base of the gun handle resting on the platform, the quad rail mount should be flush with the top of the platform. Depending on the size of your gun, the platform may need to be cut to the desired length with a saw.


Step 2:
Measure the distance between the base of the motion platform and the top of the motion platform wall. 
Step 3:
Measure the height of your sling mount and add it to the distance you measured for the height of the platform wall. For us, the total distance was 5 inches. Write this down as the height for a piece that you are about to cut. 
Step 4:
Measure the width of the platform wall. We measured 6 inches for ours. Write this measurement down as the width of a piece that you are about to cut. 
Step 5:
Cut a piece of ½ inch plywood to be the height and width that you’ve written down. We cut our piece of plywood to be 5 inches by 6 inches.

Step 6:
In the upper left corner of the plywood, align your sling mount flush with the edges and pre-drill a hole for your #10-32 1¼ inch screw. Place your sling mount over the hole and fasten it into place with a screwdriver. 
Step 7:
Mount your gun to the sling mount by sliding it into the quad rail and tightening the knob with your fingers. 

Step 8:
Remove the gun from the motion control platform and cut another piece of plywood to be the same height as the existing platform wall but 9 inches long. 
Step 9:
Remove the gun from the sling mount and install this new piece onto it by pre-drilling and fastening them together with 2 x #10 ¾” screws. 
Step 10:
Mount this piece to the existing motion platform with 2 x #2 1-¼” screws. 
Step 11:
Attach the gun to the sling mount and trace the outline of the gun with a pencil. Trace the outline of the trigger in the full forward position.  Trace the outline of the trigger in the full back position as well.
Step 12:
With a measuring tape, find the remaining distance from the board to the edge of the platform. We measured 3 ¼ inches. 
Step 13:
Cut another piece of plywood to have a width that’s the distance you’ve just measured and a length of 9 inches. Cut a notch in it for the gun handle to slide into. 
Step 14:
Pre-drill and fasten this board to the base of the motion platform with 2 x #10 ¾” screws. 

Build the firing mechanism
Step 1:
Remove the bolt from the mount. If the bolt has a knob, drill it out from the other side with a 5 mm drill bit. If you don’t have a 5 mm drill bit then a 3/16 inch drill bit will work. Once you’ve drilled the knob out, drill another hole on the other end of the bolt. Place a nut on a 5x30mm hex bolt and thread the bolt through one of the holes as shown. 

Step 2:
Draw a straight line through the outline of your trigger on the plywood. Use 2 x #10 1-¼” screws to mount the base of the surface mount bolt over the trigger and on the line. 

Step 3:
On the straight line, mount two eyelets. Insert a medium size eyelet furthest from the bolt, and insert a small eyelet closest to the bolt. 
Step 4:
Insert a cable with cable housing through the eyelets and thread it through the other hole in the bolt. 

Step 5:
Secure the cable with a cable stop. 
Step 6:
Insert a #10 1 ¼” screw in front of the surface mount bolt on the straight line. Leave it protruding as shown in the picture. 
Step 7:
Place a compression spring over the screw that you’ve just inserted and the screw in the bolt. 
Step 8:
Reattach your gun to the sling mount. 
Step 9:
Take a ½ inch mounting flange and insert a ½ inch metal pipe into it. We used a ¾ inch flange with a ¾ to ½ inch adapter because the store was out of ½ flanges. 

Step 10:
Place electrical tape toward the top of the ½” pipe. Give yourself just enough room to fit the bicycle brake and a ½ inch cap over the end of the pipe. 

Step 11:
Before you put the bicycle brake on the pipe, drill a hole through it as shown. See the video for more details. 

Step 12:
Thread the cable through the body of this bicycle break and the hole. 
Step 13:
Pull the cable taught and use a cable stop to maintain the tension. 
Step 14:
Assemble the bicycle break onto the ½ inch pipe. 
Step 14:
Mount the flange onto your control board. 
Assembling and mounting the camera/scope attachment
Step 1:

Use a 1/4” – 20 x 1” bolt to attach the camera to the scope rail mount.
Step 2:
Attach the scope in front of the camera on the scope rail mount. 
Step 3:
Attach the scope rail mount to the upper rail on the gun. 
Step 4:
Use the cable that came with the camera as well as a long extension cord to hook the camera up to your television. 

Step 5:
Turn your television on and test it out! 
Check out the video to see how we made this DIY project:
http://youtu.be/Yo3YTJ48ckw
Want 007 Training? Check out Spy Escape!
Attention Survivalists:
On TV and in the movies, spy games may seem bad-ass, but in real life, it’s a game of life and death. The reality is that spy games are live and die, and the real spies play to win.
Learn 007 Secrets
You may have seen him on the hit TV show “Shark Tank”, but for the first time ever he’s making the secrets that make CIA operatives elite ghosts available to folks like you and me.
The best part? The part that’s better than learning all the secrets and tricks that can turn you into James Bond?
He’s not just offering some guide.
He’s got a complete video course so you can see these secret techniques in action. Full videos that demonstrate and explain in full detail exactly what you need to do and what you need to prepare to hide even from other spies!
Learn these Spy Secrets Today-
Spy Escape
This is your ticket to learning everything you need to stay hidden when you want to, to protect your family when you need to, and to learn how they can find you now even when you think you’re off the grid.