

Building an off-grid water purification system at home does not mean you have to install a massive, expensive homestead system on day one. You can start with basic storage, a simple sediment filter, and a reliable purifier, then expand into rainwater collection, larger tanks, or whole-home filtration later as resources allow.
This guide shows you exactly how to install an effective water purification setup right at home specifically for 2-person households, growing families, and larger backup systems alike. Over the next few sections, we will walk through everything you need to know about storage planning, filter choices, step-by-step installation, and long-term system maintenance.
What Exactly Are We Building?
We are building an unpowered, 3-Stage Gravity-Fed Canister Nest using two stacked food-grade 5-gallon buckets and heavy-duty sequential filter cartridges. This specific setup functions completely without electrical power, municipal line pressure, or active utility hookups to strip out heavy dirt, toxic chemicals, and microscopic bacteria all within a single standalone footprint.
To help you understand how this system works before you start assembling your hardware, we will break down the mechanical process that purifies the water. Below, you will find the exact step-by-step breakdown of the three physical filtration barriers and the complete components checklist needed to build it.
The 3-Stage Mechanical Blueprint
The system uses the natural weight of the water in the upper bucket to create downward hydrostatic pressure. This pressure forces raw water through three distinct, successive purification stages:
- Stage 1: The Sediment Barrier (5 Microns): A porous pre-filter that physically traps heavy suspended solids like sand, silt, mud, and pipe rust. This frontline defense keeps the downstream filters from clogging prematurely.
- Stage 2: The Chemical Absorption Core (Activated Carbon): A dense block of granulated activated carbon that uses chemical adsorption to pull volatile organic compounds (VOCs), agricultural runoff, pesticides, industrial toxins, chlorine, and foul odors out of the water.
- Stage 3: The Biological Purification Element (0.1-Micron Absolute Membrane): A sub-micron hollow-fiber or ceramic membrane containing microscopic pores exactly 0.1 microns in size. Because dangerous waterborne pathogens like E. coli, Salmonella, Giardia, and Cryptosporidium are physically larger than 0.1 microns, they are mechanically blocked from passing through into your clean water container.

Core Components Checklist
- Food-Grade Water Storage Containers: Two heavy-duty, UV-resistant 5-gallon buckets made of rigid High-Density Polyethylene (HDPE #2).
- Sediment Filter: One 5-micron pleated or spun-polypropylene cartridge.
- Carbon Filter: One activated carbon block filter element.
- Purification Stage: One 0.1-micron absolute hollow-fiber or ceramic gravity purification core.
- Optional UV Purifier: An electronic ultraviolet light loop to neutralize viruses in automated, powered setups.
- Optional Reverse Osmosis System: A pressurized membrane system used for ultra-pure water production when line pressure is available.
- Food-Safe Tubing and Fittings: Standard food-grade vinyl lines or John Guest quick-connect push fittings.
- Shutoff Valve: A high-quality plastic or brass spigot valve to control the flow of clean water from the bottom bucket.
- Water Test Strips: Simple chemical testing kits to verify your final output water quality.
Start With Your Water Source
Before buying a single piece of filtration hardware, you must identify exactly where your water will come from. Your raw input water directly dictates the thickness of your sediment filters and the replacement frequency of your carbon elements.
Now that we know your source defines your filtration workload, let’s look at how municipal lines, private wells, rainwater catchments, standing storage, and open creeks require completely different pre-filtering approaches to protect your final purification core.
Municipal Water Backup
If you are tapping into city lines, your primary goal is removing chemical additives like chlorine or chloramines, along with aging pipe scale. This setup requires less aggressive sediment pre-filtration and focuses heavily on carbon blocks and storage preservation.
Well Water
Well water bypasses city treatment entirely, making it highly susceptible to underground mineral runoff, fine sand, iron, and sulfur. A well-based system demands heavy sediment pre-filtration to prevent your fine purification stages from instantly clogging.
Rainwater Collection
Rainwater is incredibly clean until it hits your roof, where it sweeps up bird droppings, leaf rot, and atmospheric dust. Making this water drinkable requires a multi-staged defense of debris screening, fine sediment filtration, and absolute biological purification.
Stored Emergency Water
Water sitting static in tanks or barrels will not collect new dirt, but it can develop dangerous bacterial growth or stagnation over time. Systems drawing from standing storage require targeted purification or circulation to ensure the water stays safe to drink.
Creek, Pond, or Surface Water
Open surface water carries the highest risk of chemical runoff, agricultural waste, and dangerous parasites like Giardia. This source should be reserved for emergency use only, and it must never be used without an aggressive, multi-stage treatment sequence.
While city water might only need extra filtration and storage to be completely viable, rainwater requires dedicated debris screening and fine sediment stages before it ever hits a purifier. Surface water demands the most extreme caution; running it through a basic filter without proper multi-stage treatment is a recipe for severe illness.
What You Need to Install Water Purification System at Home
Building a reliable home water system requires gathering specific, high-quality components that fit together without leaking under pressure or gravity load.
Basic System Components
- Food-Grade Water Storage Container: Heavy-duty, UV-resistant 5-gallon buckets (HDPE #2) for a gravity setup, or large 55-gallon drums and IBC totes for bulk storage.
- Sediment Filter: A 5-micron pleated or spun-polypropylene cartridge to catch dirt and rust.
- Carbon Filter: An activated carbon block filter to remove chemicals, pesticides, chlorine, and foul odors.
- Purification Stage: A 0.1-micron absolute gravity filter, countertop filter, or under-sink filter kit to trap microscopic pathogens.
- Optional UV Purifier: An electronic ultraviolet light loop to neutralize viruses and bacteria in automated setups.
- Optional Reverse Osmosis System: A pressurized membrane system for ultra-pure water production.
- Food-Safe Tubing and Fittings: Standard PEX lines, food-grade PVC, or John Guest quick-connect fittings.
- Shutoff Valve: High-quality ball valves to isolate different sections of the system during a filter change.
- Water Test Strips: Simple chemical test kits to verify your output water quality.
The Assembly Order
To protect your expensive purifiers from getting ruined by heavy debris, your hardware must be assembled in a strict, logical sequence:
Storage Tank or Water Line → Sediment Filter → Carbon Filter → Purification Stage → Clean Water Container or Faucet
By placing the coarse sediment filter first, you catch the heavy sand and rust before it can choke your carbon block or fine purification elements.
Choose the Best Water Purification Method
Choosing the right filtration method comes down to balancing your available power, your physical space, and your daily volume requirements.
Gravity Filters
Gravity filters are the absolute gold standard for no-electricity backup systems. Because they rely entirely on the natural pull of gravity to draw water through ceramic or hollow-fiber elements, they are highly reliable for renters, off-grid cabins, and emergency storage areas.
Countertop Filters
Countertop filters sit right next to your kitchen sink and attach directly to your existing faucet aerator. These systems are an excellent, low-maintenance choice for families who want clean, daily drinking water without cutting into their home’s permanent plumbing lines.
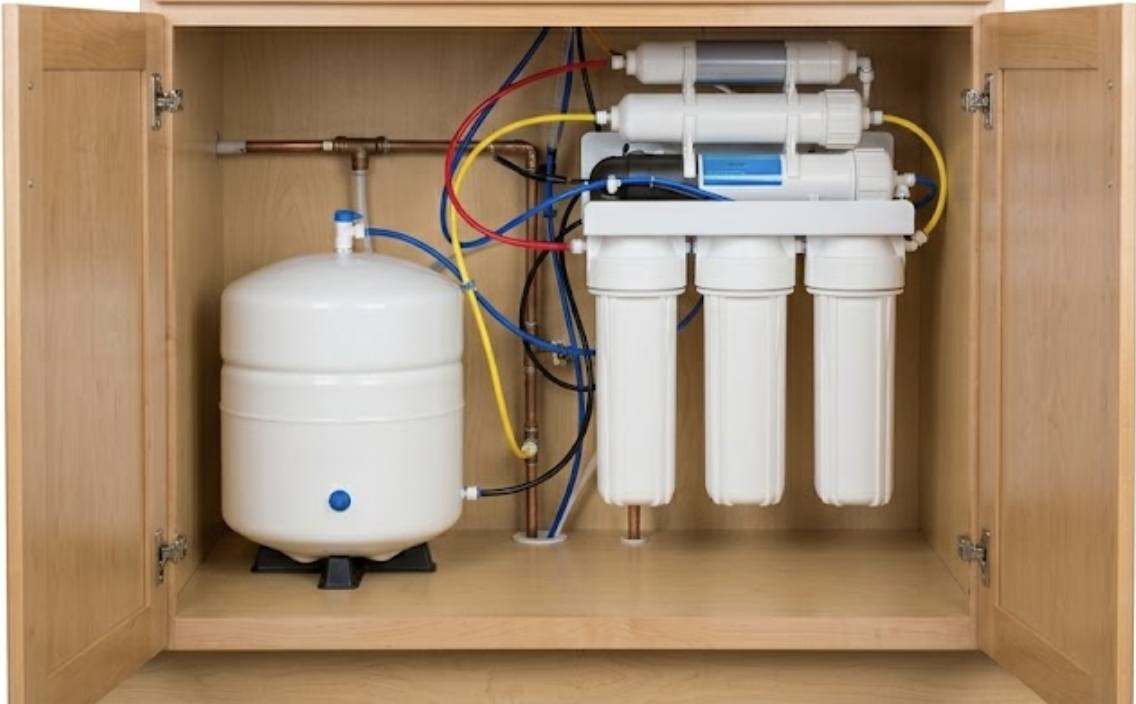
Under-Sink Filters
Under-sink filters are hard-plumbed directly into your cold water line, delivering purified water through a dedicated, separate faucet. This is the cleanest, most permanent setup for homeowners who want high flow rates and zero clutter on their countertops.
Reverse Osmosis
Reverse osmosis (RO) systems force water through a semi-permeable membrane to strip away up to 99% of all dissolved solids, heavy metals, and chemical contaminants. While they offer unmatched chemical purity, they require consistent water pressure to function and produce a steady stream of wastewater.
UV Purification
Ultraviolet (UV) purifiers use specific light wavelengths to scramble the DNA of bacteria and viruses, rendering them completely harmless. They are incredibly useful as a final safety layer for well water or rainwater systems, though they generally require a consistent source of electricity to power the bulb.
How Much Water Storage Does Your Family Need?
A simple planning rule is one gallon per person per day for drinking and basic cooking, though you should realistically store three gallons per day to cover hygiene and cleaning. This foundational capacity ensures your household can maintain basic health standards if your primary water lines are disrupted.
To map this storage target out for your specific household, let's look at the baseline weekly requirements and examine how to balance your containers to ensure maximum portability during a crisis.
Weekly Storage Capacity Benchmarks
| Household Size | Minimum Weekly Survival Capacity | Recommended Total Storage Target |
| 2 People | 14 Gallons | 30–42 Gallons |
| 4 People | 28 Gallons | 60–84 Gallons |
| 6 People | 42 Gallons | 90–126 Gallons |
Bulk Storage vs. Portability
Large families should never rely on a single massive container for their entire water reserve. If that single tank cracks, springs a leak, or gets contaminated, your entire water security disappears in an instant. Instead, build a redundant system using a layered mix of portable jugs, stackable 5-gallon containers, and a larger centralized reserve tank.
For Outdoor Setup: DIY Rainwater Collection System

A simple rainwater harvesting system relies on a multi-layered screening process to keep leaves, roof grit, and organic material out of your drinking supply. Without these frontline debris barriers, your downstream 3-stage purification canister will clog up with organic muck during the very first rainstorm.
To understand exactly how this outdoor setup interacts with your indoor purifier, remember that the rainwater collection system functions as your raw harvesting array, while the gravity canister serves as your processing plant. Let's walk through the hardware chain required to safely harvest rainwater before you bring it indoors to filter.
The Rainwater Collection System Components
- Roof Catchment: Your primary collection footprint (smooth metal roofs are cleanest; avoid old asphalt shingles).
- Gutters: Properly sloped channels to collect rainfall and route it toward your storage tanks.
- Downspout Diverter: A mechanical switch that allows you to direct water into your tanks or out to the yard.
- Leaf Screen: A coarse mesh cover over your gutters or tank inlets to deflect leaves and twigs.
- First-Flush Diverter: A critical vertical pipe that captures and isolates the very first few gallons of roof runoff, which contain the highest concentration of dust and bird droppings.
- Rain Barrel or Storage Tank: Dark, food-grade containers that block sunlight to prevent internal algae growth.
- Overflow Valve: A wide bulkhead exit at the top of the tank to safely vent excess water during heavy downpours.
- Sediment Filter: A fine inline cartridge to catch micro-particles that bypassed the initial screens.
- Purification System: The final safety stage (like a gravity core or UV loop) that makes the stored water safe to drink.
Remember, rainwater should be collected, screened, stored, filtered, and thoroughly purified before you ever consider drinking it. For basic garden use, your setup can be simple. But for drinking water, your downstream filtration and purification stages matter immensely.
Ready to build your own catchment array? Check out our top-rated rain barrel kit:

- Package Included: Our rainwater collector can be easily installed in just 5 minutes. The rainwater collector kit includes a...
- Durable Material: This downpipe filter diverter is made of high-quality thickened PVC and rubber materials, tear-resistant...
Last update on 2026-07-06 / Affiliate links / Images from Amazon Product Advertising API
Step-by-Step: How Do You Install This Water Purification System?
You install this system by prepping your food-grade buckets, mounting the filter cartridges in sequential order, and flushing the lines thoroughly before drinking. The entire DIY assembly process takes less than an hour using basic hand tools like a standard drill and a utility knife.
Now that you know how quick and simple the build is, let's go over the eight precise construction steps to ensure your new off-grid filter is built perfectly without any structural leaks.
1. Pick the location
Choose a cool, shaded, and easily accessible area to house your system, such as a kitchen utility room, pantry, garage, or basement. Keeping your water storage out of direct sunlight is absolutely critical to preventing biological growth and algae inside your lines.
2. Set up water storage
Position your food-grade containers on a completely level, sturdy surface that can handle heavy weight, keeping in mind that water weighs roughly 8.34 pounds per gallon. Clean and rinse each container thoroughly before filling, and clearly label each tank with its initial fill date.
3. Install the sediment filter
Mount your sediment filter housing directly on the line coming out of your raw water storage container. This cartridge catches heavy dirt, rust, sand, and larger suspended particles before they can reach and choke your finer primary filters.
4. Add carbon filtration
Plumb your activated carbon block filter housing directly inline right after the sediment filter stage. The carbon media works to strip out chemical tastes, industrial odors, chlorine, and volatile organic compounds from the water.
5. Connect the purification stage
Connect your final purification hardware—which, in this gravity setup, consists of a 0.1-micron absolute hollow-fiber or ceramic purification element nested inside the lower chamber. This stage eliminates microscopic pathogens like bacteria and protozoan cysts, ensuring the output water is biologically safe.
6. Flush the system
Do not drink the first few gallons of water that pass through a fresh build. Open your valves and run water through the entire system for several minutes according to the manufacturer’s instructions to flush out manufacturing dust and loose carbon particles.
7. Test the water
Dip a high-quality water test strip into your final clean water container to verify your output quality. If you are setting up a system to clean a completely raw source like a newly tapped well or a rainwater catchment array, send a sample to a local lab for comprehensive analysis.
8. Label maintenance dates
Use a permanent marker to write the installation date and the next scheduled filter replacement date directly on the filter housing or storage lid. Never trust your memory when it comes to your family's clean water supply lines.
How Do You Scale From 2 People to a Large Family?
You scale this home water system by systematically adding parallel filtration lines and expanding your total storage volume from small portable jugs to multi-hundred-gallon bulk tanks. This prevents a high daily volume draw from slowing your water production down to a crawl or wearing out a single filter element prematurely.
This step-by-step expansion prevents high daily volume needs from stalling your water production, which highlights a major structural choice between simple gravity setups and pressurized plumbing options. Let's look at how these two engineering strategies perform when the power grid goes completely dark.

While a hard-plumbed inline canister system provides high flow rates and daily convenience for a large family, it introduces major structural failure points. High-pressure lines can crack, custom fittings can leak, and if your electric pump fails, the entire system stops instantly. For absolute security, large families should run a high-volume inline system for daily convenience, but keep an unpowered gravity bucket nest on standby as a zero-fail fallback backup.
What Is the Proper Maintenance Schedule for Your Water System?
The proper maintenance schedule requires checking for leaks weekly, flushing lines monthly, deep-cleaning collection tanks seasonally, and running water quality tests annually. Sticking to this routine preventative timeline keeps your mechanical barriers clean and prevents dangerous contamination inside your lines.
Now that we understand the importance of routine system upkeep, let’s break down your specific tasks into weekly, monthly, seasonal, and annual checkpoints to keep your hardware running flawlessly year-round.
Weekly
- Check all plumbing joints, tubing connections, and valves for tiny pinhole leaks.
- Inspect your storage containers for any signs of structural bowing, cracking, or stress.
- Confirm your active water levels to ensure your source inputs are replenishing properly.
Monthly
- Flush water through any unused emergency backup lines to prevent stagnation.
- Rotate the water inside your smaller, portable containers to keep the supply fresh.
- Check your filter flow rate; a sudden drop in water pressure means your sediment filter is full.
Seasonally
- Drain and deep-clean the interior of your rain barrels to clear out fine silt buildup.
- Inspect your gutters, leaf screens, and first-flush diverters to clear out seasonal leaf debris.
- Replace any worn-out rubber seals or O-rings inside your filter housings to prevent leaks.
- Check your system for algae risks or freezing hazards as the winter months approach.
Annually
- Replace any long-term storage containers that show signs of UV damage or wear.
- Test your raw well or rainwater source to check for shifting chemical or bacterial levels.
- Review your family’s total water needs to ensure your storage array is still large enough.
What Are the Common DIY Installation Mistakes?
The most common installation mistakes are skipping the sediment pre-filter, storing your water in direct sunlight, and using non-food-grade containers that leach toxic chemicals into your supply over time. These errors will either completely ruin your expensive micro-filters within a matter of days or unknowingly compromise the safety of your drinking supply.
These critical design errors can easily ruin your expensive micro-filters within a matter of days or compromise your health, so let’s review what traps to avoid when setting up your gear and look at real-world operational warnings regarding filter limitations.
- Buying Filters Before Knowing the Water Source: A filter designed to clear city chlorine will get instantly ruined if tasked with cleaning muddy creek water. Always test your source first.
- Skipping Sediment Filtration: Running raw water straight into a fine carbon block or purification membrane will choke the expensive element in a matter of days. Always use a cheap, disposable sediment pre-filter.
- Using Non-Food-Grade Containers: Standard blue utility barrels or cheap construction buckets leach toxic plastic chemicals into your drinking supply over time. Look for the food-grade recycling symbol (typically HDPE #2) on every container you use.
- Forgetting Replacement Dates: Filters do not last forever. An old, saturated filter will eventually begin dumping trapped contaminants right back into your drinking water. As one experienced off-grid user warned on a public survival forum: “The mechanical filter did not remove chemicals… I could still taste the chlorine added by the city line.” Always match your filter elements to the specific contaminants in your source.
- Storing Water in Direct Sunlight: Algae requires light to grow. Keep all water lines, filters, and storage tanks completely shaded, insulated, or blacked out.
- Building a System Too Small for the Household: Planning for bare-minimum survival drinking water without accounting for sanitation, hygiene, and pets will leave your family stranded on day three of an emergency.
- Having No Backup Purification Method: If your electric UV filter or high-pressure RO system loses power or breaks a fitting, you must have a non-electric, mechanical backup method like a standard gravity filter ready to take over.
Securing Clean Water Source
True water security does not come from a temporary supply of bottled water tucked away in a closet. Real self-reliance means having a dependable, unpowered mechanical system that can step up the moment your local utility infrastructure steps down. Gather your components, map out your storage footprint, and establish your off-grid water independence today.
Frequently Asked Questions
What is the best water purification system for off-grid living?
For most families, a high-quality gravity filter is the easiest and most reliable off-grid option because it requires zero electricity to run. Larger homes or cabins with active solar power may prefer an under-sink or whole-house multi-stage canister system to get higher flow rates.
Can I install water purification at home myself?
Yes, simple countertop and gravity-fed twin-bucket systems are completely beginner-friendly and require zero tools to set up. Under-sink and whole-house canister systems require some basic DIY plumbing skills, but can easily be installed using standard quick-connect fittings and simple hand tools.
How do I build a home rainwater collection system?
Start by routing your roof gutters through a coarse leaf screen, connecting a first-flush diverter to isolate the initial dirty roof runoff, and running the clean water into a dark, food-grade storage barrel. From there, run the water through an inline sediment filter and a final purification stage before drinking.
Do I need water storage if I already have a purifier?
Yes. A purifier cleans water, but storage ensures you actually have water to clean when the tap, well pump, or rain supply is completely unavailable. A purifier is useless if you do not have raw water to feed into it.