

At a Glance: Winterizing Your Home
- Prioritize Your Structural Envelope: Audit your furnace and seal air leaks to keep heat inside where it belongs.
- Master the “Warm Zone” Strategy: Pivot from heating an entire home to creating a micro-climate using tents and sleeping bags to conserve energy.
- Protect Your Life-Support Systems: Implement the “Expansion Rule” for water storage and the “20-Foot Rule” for generator placement.
- Audit Your Survival Tech: Ensure your battery chemistry and CO detectors are specifically rated and positioned for sub-zero safety.
We are getting to that time of year when things will begin to freeze at night. The leaves are falling and there is that crisp feeling in the air. As much as I love fall, I am not a big fan of the winter months. In addition to just disliking cold weather, winter weather can also do damage to my home. In many cases, winter provides the highest utility bills of the year as well. However, with a few simple steps you can ensure that damage is avoided and your bills stay as low as possible. In this article the tips and tricks in winterizing your home!
Essential Systems and Household Equipment for Winterizing Your Home
To protect your family from the extreme cold, you must treat your house like a survival machine. This means checking your main structures, creating a safe warm space, and securing your power. By following these steps, you can prevent common failures during winter emergencies such as snowstorms or blackouts.
Primary Sealing Systems: Securing the Structures
Your house is your first line of defense against the freezing wind outside. Start by making sure your main heater is ready and that no cold air can sneak through the cracks. This part of the plan focuses on fixing leaks in your doors and windows to keep the warmth inside your home. By checking these big systems now, you make sure your family stays safe, and your bills stay low.
“The Draft Blockers & Seals”
- The Incense Test: Hold a lit stick of incense near windows or pipes to see if the smoke blows away, indicating where a leak is.
- Block the Air: Place a “draft dodger” or a rolled-up towel at the bottom of all exterior doors to keep cold air out.
- Seal the Glass: Apply plastic film over windows to keep heat from escaping and stop cold drafts.
- Flip the Fan: Switch your ceiling fan to spin the other way to push warm air down from the ceiling.
Winter Household Gear for Sealing:
- Draft Dodgers: Fabric tubes or rolled towels to seal the gap under doors.
- Window Film: Clear plastic sheets and a hairdryer to “shrink-wrap” leaky windows.
- Caulk & Weather Stripping: Used to fill gaps around chimneys, wires, and foundation pipes.
- High-Quality Filters: HEPA or electrostatic filters to keep furnace air clean and running efficiently.
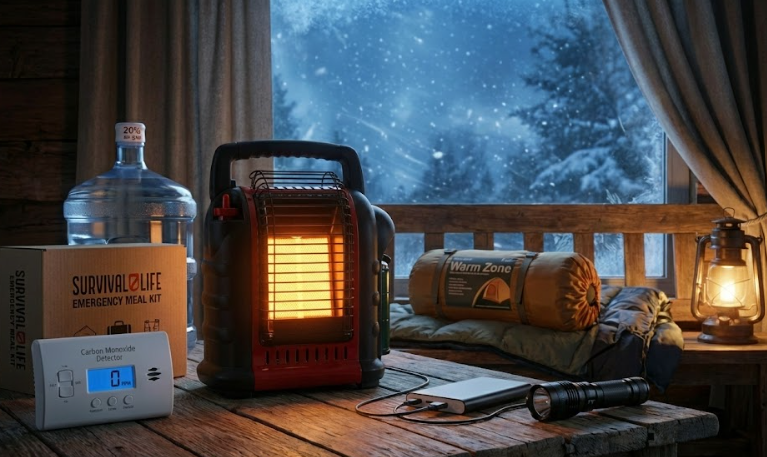
The “Warm Zone” Strategy: Heat and Air Safety

If a winter blackout occurs, you’ll need a smart way to stay warm without using the furnace. Instead of trying to heat every room, designate or create a small “warm zone” that’s spacious enough for everyone to gather. This section explains how to use indoor heaters safely to avoid inhaling invisible gases that can make you sick. These simple tools and rules will help you fight the cold without taking any dangerous risks.
The “Low-Level” Placement Rule
- The Safe Height: Move your Carbon Monoxide (CO) detector to knee-height to detect the “silent killer” gas that settles low.
- The Micro-Climate Hack: Pitch a small camping tent inside a central room to trap your body heat in a tiny space.
- Safe Backup Heat: Use a propane heater labeled “indoor-safe,” and ensure you’re awake to watch it.
- Check the Air: Always keep a window cracked by 1 inch to let in fresh air while using backup heat.
Winter Household Gear for Heat:
- Indoor-Safe Heater: A propane “Buddy” heater specifically made for indoor use.
- CO Detector: A battery-powered alarm to track dangerous gas.
- Warm Zone Tent: A small tent to create a “micro-climate” indoors.
- Propane Fuel: Extra canisters stored in a safe, ventilated area outside the house.
- Sleeping Bag/Bivy: A high-rated thermal bag to serve as your ultimate emergency sleeping backup.
Sleeping Bag Specs: What to Look For
- Temperature Rating: Ensure the bag is rated for “Survival” or “Comfort” at 0°F or lower to handle uninsulated indoor drops.
- Fill Material: Look for Hydrophobic Down or high-grade Synthetic insulation that retains heat even when damp from breath condensation.
- The “Mummy” Shape: Choose a bag with a contoured hood and draft collar to seal in heat around your head and neck.
- R-Value Insulation: Always pair your bag with a sleeping pad; look for an R-value of 4.0 or higher to stop the floor from sucking away your body heat.
- Bivy Compatibility: Verify the bag fits inside a breathable bivy sack, which can reflect up to 70% of your body heat back to you.
Last update on 2026-07-18 / Affiliate links / Images from Amazon Product Advertising API
(As an Amazon Associate, we earn from qualifying purchases.)
The Hydration System: Plumbing & Storage
Frozen pipes can burst and leave your home without any water to drink or use. You can protect your plumbing by insulating pipes and ensuring your storage containers are ready for ice. This part of the guide shows you how to store water so it doesn’t break its bottle when it freezes. Following these steps means you won’t have to worry about a dry faucet during a winter storm.
The “Expansion Rule” Storage Protocol
- Leave the Gap: Fill your water jugs only 80% full and leave about 2 inches of air at the top.
- The Squeeze Test: Ensure the bottle has some “give” so the ice has room to grow upward.
- Protect the Pipes: Set your faucets to a slow, constant drip to keep water moving so it won’t freeze.
- Insulate the Jugs: Wrap your stored water in blankets or keep them in a closet to slow down freezing.
Winter Household Gear and Practice for Water Storage:
- Pipe Foam: Precut foam tubes for wrapping exposed water pipes.
- Stored Water: At least a gallon of water per person, per day.
Energy & Safety: Powering Through a Blackout
If the lights flicker and go out during winter conditions, you’ll need batteries and lights that can work in the cold. Some batteries stop working when it gets too icy, so you have to choose the right ones for your flashlights. This section covers how to stay connected and keep a safe distance from outdoor generators. These final checks will make sure you won’t get left in the dark if a flurry hits.
The “Cold-Weather” Tech Check
- The 20-Foot Rule: Keep any outdoor generator at least 20 feet away from windows or doors to keep smoky air out.
- Warm Your Power: Keep small battery packs inside your pockets or wrapped in a wool sock to keep them warm.
- Check Your Specs: Verify your batteries can handle sub-zero starts, as standard lithium often fails.
- The Lighting Station: Keep your flashlights in one easy-to-reach spot so you can find them in total darkness.
Winter Household Gear for Power:
- Rechargeable Battery Pack: To keep phones and emergency alerts running.
- First-Aid Kit: Supplies to fix minor injuries if help cannot reach you through the ice.
- Emergency Radio: A battery or hand-cranked radio to hear weather updates.
- High-Lumen Flashlight: A very bright light to see in a pitch-black house.
Flashlight Specs: What to Look For
- Output Modes: Ensure it has a “moonlight” mode for 100+ hour runtimes and a high-output “turbo” for outdoor checks.
- Cold-Cell Compatibility: Look for lights that accept CR123A Lithium batteries, which are superior in freezing temps.
- IPX8 Waterproofing: Essential for reliability in sleet, snow, or if dropped in a puddle.
- Hands-Free Capability: Tail-stand capability or headlamp features let you work with both hands.
Last update on 2026-07-18 / Affiliate links / Images from Amazon Product Advertising API
Winterizing your home is a critical safety measure that prevents a power outage from turning into a life-threatening emergency. Take the time now to audit your “Warm Zone,” secure your water supply, and properly position your safety gear. Before the coldest hours of the night, take action to ensure your home is ready for whatever extreme winter condition brings.
DOWNLOAD THE WINTERIZING EQUIPMENT CHECKLIST HERE
FAQs
What are the first steps to take when a storm is already hitting? The most important part of winterizing your home during an active storm is creating your “Warm Zone”. Seal off one central room with towels at the door bases and move everyone inside to keep body heat concentrated.
Where is the safest place to put a Carbon Monoxide detector? While many people mount them high, the safest place during a winter lockdown is at knee-height. This is because certain gases can settle lower in the air, and placing the detector near where you are sleeping ensures you are alerted to the “Silent Killer” before it reaches your breathing zone.
What is the “Expansion Rule” for water storage? The Expansion Rule is a protocol where you fill water containers only 80% full. Leaving a 20% air gap allows the water to expand into ice if your home loses heat, preventing the containers from bursting and leaving you without a water supply.
Can I use a standard camping tent for an indoor “Warm Zone”? Yes, a standard camping tent is highly effective for creating a micro-climate. By pitching it inside a room, you trap the body heat of the occupants in a smaller cubic area, which is significantly easier to keep warm than an entire uninsulated house.
Why does my generator need to be 20 feet away from the house? Generators produce lethal amounts of carbon monoxide. Placing them 20 feet away ensures that exhaust fumes do not drift into open windows, vents, or doors, which is a leading cause of the winter fatalities reported this year.