

A paracord belt diy is a versatile and durable accessory made from a woven parachute cord, commonly known as a paracord. This belt type is known for its strength and functionality, making it a popular choice for outdoor enthusiasts, survivalists, and everyday wearers.
The paracord used in these belts is typically made of nylon and consists of several inner strands that can be separated and used for various emergencies.
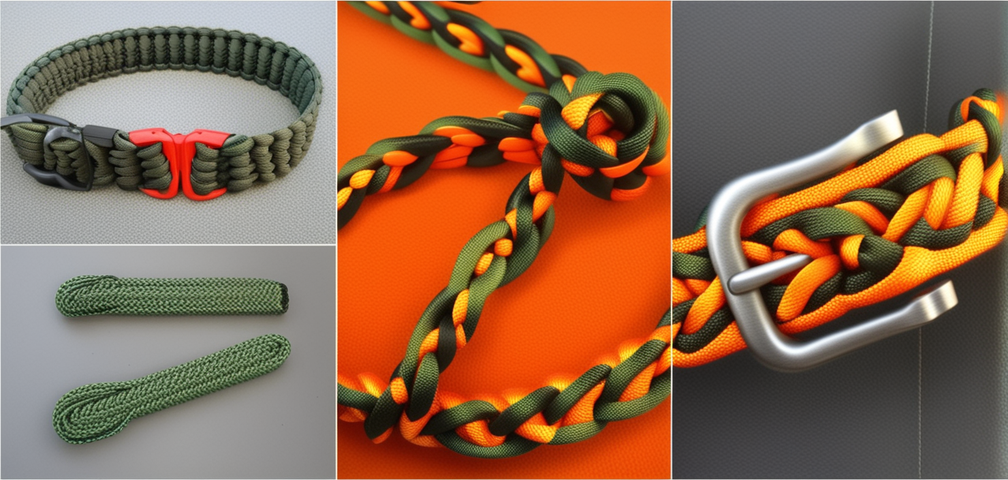
The construction of a paracord belt diya involves intricate weaving techniques, often using the cobra weave or Solomon bar knot pattern, to create a sturdy and flexible design. These belts come in various colors and designs, allowing individuals to customize their look and match their style.
Popular Paracord Belt Diy Design
1. Classic Cobra Weave Belt
The classic cobra weave is one of the most popular and straightforward patterns for making a paracord belt. It involves a simple over-and-under weaving technique using two strands of paracord. To start, measure and cut the desired length of paracord, ensuring you have enough to fit your waist comfortably with extra buckle closure.
Attach the buckle to one end of the paracord and weave the right strand over the center core, then pass the left strand over the right and under the center core, pulling it through the loop on the right side. Repeat this process, alternating sides until you reach the desired length. Finally, attach the other end of the buckle and secure the loose ends by melting them slightly with a flame.
2. King Cobra Paracord Belt
The king cobra paracord belt is an advanced version of the classic cobra weave, offering enhanced strength and durability. To create this pattern, you’ll need four strands of paracord instead of two. Start by attaching the buckle to one end of the paracord and make the base layer using the classic cobra weave technique.

Once you reach the desired length, switch to the king cobra weave by adding a second layer on top of the base layer. Take the outer right strand from the base layer and weave it over and under the center core of the top layer. Do the same with the left outer strand. Continue weaving the top layer until you reach the end of the belt. Secure the loose ends by melting them with a flame.
3. Trilobite Paracord Belt
The trilobite paracord belt diy features a visually stunning design that resembles the ancient marine arthropod. It requires four strands of paracord and offers a unique and textured appearance.

To begin, craft the base layer using the cobra weave technique. Afterward, skillfully take the right outer strand and weave it over the center core, then gracefully tuck it under the left outer strand. Following the same precision, take the left outer strand and deftly weave it under the center core before confidently looping it over the right outer strand.
Continue repeating this pattern along the entire belt length. For added security, slightly melt and secure loose ends using a flame.
4. Fishtail Paracord Belt
The fishtail paracord belt is an excellent choice for those who love color variation and want a visually appealing design. It involves using multiple paracord colors to create alternating fishtail knots.
Start by attaching the buckle to the paracord’s end and then create fishtail knots. To make a fishtail knot, take two strands of 550 paracords, cross the right one over the left, and then pass it behind and through the loop on the left side. Pull both strands to tighten the knot. Repeat this process with the following two strands, alternating colors as desired, until you reach the end of the belt. Attach the other end of the buckle and secure the loose ends by melting them with a flame.
5. Diamond Knot Paracord Belt
The diamond knot paracord belt adds an elegant and intricate touch to the design. To create this pattern, you’ll need four strands of paracord. Start by making the base layer using the cobra weave technique. Once you reach the desired length, switch to the diamond knot pattern.
Weave the right outer strand over the two center strands, then under the left outer strand. Do the same with the left outer strand but in the opposite direction. Tighten the knot by pulling both strands. Repeat this pattern for the entire belt and secure the loose ends by melting them.
6. Box Knot Paracord Belt
The box knot paracord belt features a square pattern that looks stylish and modern. Start by attaching the buckle to one end of the paracord and then create the base layer using the cobra weave technique. Once you reach the desired length, switch to the box knot pattern.
To create the knot, first, take the right outer strand and pass it over the two center strands, then bring it under the left outer strand. Next, pass the left outer strand under the two center strands, then bring it over the right outer strand. Now, pull both strands to tighten the knot. Continue repeating this pattern throughout the belt until you reach the end. Finally, secure the loose ends by melting them with a flame.
7. Viper Knot Paracord Belt
The viper knot paracord belt diy showcases a distinctive snake-like pattern that adds a touch of uniqueness to the design. To create this pattern, you’ll need four strands of paracord. Start by making the base layer using the cobra weave technique. Once you reach the desired length, switch to the viper knot pattern.
Weave the right outer strand over the two center strands, then under the left outer strand. Weave the left outer strand under the two center strands, then over the right outer strand. Pull both strands to tighten the knot. Repeat this pattern throughout the belt until you reach the end. Secure the loose ends by melting them with a flame.
8. Thin Line Solomon Bar Paracord Belt
The thin-line Solomon bar paracord belt is a sleek, streamlined design that uses two strands of paracord. Start by attaching the buckle to one end of the paracord and then create the base layer using the Solomon bar weave technique.
Once you reach the desired length, add thin lines to the design by weaving a separate strand of paracord through the middle of each Solomon bar. Secure the thin lines by melting the ends with a flame. Finally, attach the buckle’s other end and secure the belt’s loose ends by melting them slightly.
9. Sawtooth Paracord Belt
The sawtooth paracord belt features a jagged and edgy design that resembles the teeth of a saw. To create this pattern, you’ll need four strands of paracord. Start by making the base layer using the cobra weave technique. Once you reach the desired length, switch to the sawtooth pattern.
Weave the left outer strand under the two center strands, then over the right outer strand. Pull both strands to tighten the knot. Repeat this pattern throughout the belt until you reach the end. Secure the loose ends by melting them with a flame.
10. Striped Paracord Belt
The striped paracord belt allows you to play with different colors and create a visually appealing design. Start by attaching the buckle to one end of the paracord and then make the base layer using the cobra weave technique. Once you reach the desired length, add stripes to the design by weaving separate strands of paracord in different colors through the middle of the base layer. Secure the strips by melting the ends with a flame. Finally, attach the buckle’s other end and secure the belt’s loose ends by melting them slightly.
Paracord belts diy offer significant advantages for survival situations. The high-strength and durable nature of paracord makes it a reliable and versatile tool in emergencies. If needed, you can unravel the belt to access several feet of strong rope, which can be used to build shelters, create traps, secure gear, or even make a makeshift tourniquet. The inner strands of paracord can be used as fishing lines, sewing threads, or even for medical purposes like suturing wounds.
A paracord belt diy on hand enhances your preparedness and resourcefulness, ensuring you have a valuable tool that can serve multiple functions and increase your chances of survival in challenging situations. Its compact and lightweight design makes it easy to carry around and an essential addition to any survival kit or outdoor adventure.
Share your thoughts with us in the comments section below!
Up Next:
- How to Use a Bore Snake | Gun Care
- Knifemaking: Make a Knife From An Old Wrench
- How To Use a Picture Frame For Hidden Gun Storage
Follow us on Facebook, Instagram, Twitter, and Pinterest!
Disclaimer: All content on this site is for informational purposes only. Please read our full disclaimer here.


