

With spring here and summer just around the corner, its time to start preparing for high temperatures.
Heat waves cause serious illness and kill people in major cities every summer.
Whether the cause is power outages or lack of access to air conditioning, people fall victim to the heat and lack of preparedness.
Even in less dire circumstances, being stuck without air conditioning in the summer can be extremely uncomfortable and wreak havoc on your body.
With the know how provided by this DIY, you can , you can find quick relief and ensure your safety from dangerous heat waves.
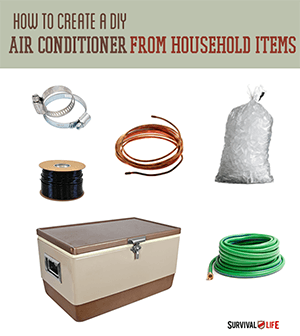
Materials:
Large Ice Chest
Ice
Water hose and access to running water
2 lengths of 1/4 inch vinyl tubing
1 length of 1/4 inch copper tubing
2 hose clamps
Box fan

Step 1.

Fill up your biggest and most insulated ice chest/cooler with ice and water. Either place it in a high place or stack up some crates, boxes, etc. to create a sturdy platform for you cooler to sit on. When you’re all set up, run a water hose into the cooler and leave it running.
Step 2.
Connect a length of 1/4 inch vinyl tubing and 1/4 inch copper tubing with a hose clamp. Submerge the vinyl end of the tubing into your filled ice chest, weighing it down under the water with a small weight tied around the tube.
Step 3.

Connect your copper tubing along one end of a box fan(for ultimate summer preparedness, you’ll need one that doesn’t need to plug into the wall), running side to side along the face of the fan leaving a little space between the rows of tube. Fix into place with zip ties. This will create your “radiator”.
Step 4.
Warm air enters the fan, passing over your copper tubing full of ice cold water, causing the air to cool before continuing through the fan onto the other side.
Step 5.
Cool air pumps out of the fan, creating air conditioning.
Step 6.
Take the end of your copper tubing and run it out and away from your fan, then add another length of vinyl tubing with a hose clamp. This will be your outflow. Either run it outdoors, somewhere with a sink, or somewhere you can use the water.
Extra Tip:
This whole operation relies on gravity! That’s why your cooler is propped up somewhere high. Therefore, your outflow must remain lower than your cooler at all times. Once you’re all set up, create suction on your outflow to get the cold air pumping and the air conditioner working!


