

Sometimes I realize it’s easier to make the tool I need than to spend hours or days trying to find one that’s already
just the way I want it.
This was true once again when clearing a trail in the woods- neither a machete or
an axe was up to the task.
The scraggly trees we have in North Texas can be quite resilient when being
cut. In fact- there aren’t many trees in Texas that give up their limbs easily.
Everything in the Lone Star State seems to be impossibly tough!
A store bought machete just bent and deflected off most branches even though
it was freshly sharpened, and the axe was nearly impossible to aim at smaller
limbs. The blunt chopping blade of the axe would just bend the limbs out of the
way and barely scratch them.
There are some really nice machetes from knife companies that would probably
work better, but sometimes it’s important to know how to make your own.
Especially if there are no stores to go to, or inflation has made buying one out of
the question. These important skills can be put towards making any type of blade
you may need.
Metalworking is an art that is learned over time. I’m by no means the best metal
worker around, far from it. I just practice and take my time when working with
metal.
First you’ll need metal to make the blade out of. Since your making a sharpened
blade you’ll want hardened steel. Old saw blades from sawmills are great for
making knife blades. They can be found at flea markets anywhere in the country.
There are other places you can scavenge hardened steel from such as
lawnmower blades and circular saw blades. New hardened steel sheet can also
be purchased at most metal supply shops. I’ve even seen guys forge amazingly
strong knife blades out of railroad spikes!
After you’ve picked out your metal you’ll need to cut it. For hardened steel a good
metal band saw or plasma cutter works well. Since I have neither of those, a
trusty cutting torch is my go-to metal cutter.
Take the cutting slow so you don’t over heat the metal. Just a little at a time.
Overheating causes warping and can alter the molecular structure of the steel
making it soft and unable to hold a good edge.
(Note On Heat Treating)
When you’re making a cutting blade, the hardness of the metal is important
to being able to hold an edge. By starting with a hardened steel I can skip
heat treating and tempering- but I’m also not making a “perfect” blade. Heat
treating and tempering can be a seriously dangerous process. Leave that to the
professionals until you’re completely ready!
Cut the blade out larger than you want it so you can grind it down to the size and
shape you want. This was any metal I overheated while cutting will get ground
away. You can overheat while grinding as well so use light pressure and grind off
just a little at a time.
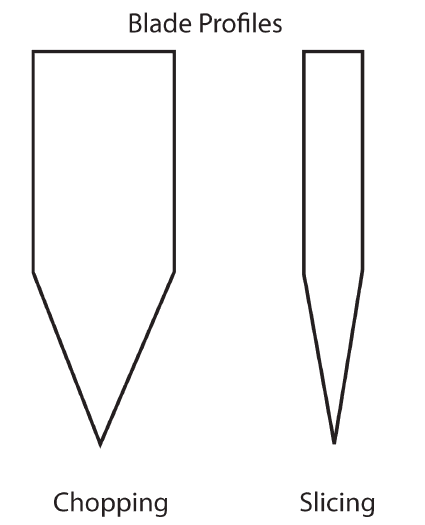
Shaping your blade profile is a whole ‘nother art form that takes time and
experience. I did a little research and decided on a profile that didn’t have to
extreme of an angle, if I need more cutting power I can always profile the cutting
edge more. The profile is how angled the cutting edge of your blade is. This
makes the edge longer and thinner (slicing) or more blunt (chopping).
See the diagram for a quick visual:

To profile the blade I started with an angle grinder while I had my blade locked
into a table mounted vice. Then I moved to a bicycle pedal style grinder stone.
I like this machine because I feel close to the metal, and it’s more accurate
because it doesn’t chew into the metal near as quickly.
You can do this with many different types of grinders, many use a bench-
mounted grinder, and people who make large amounts of blades like to use a
metal working belt sander.
When the blade edge is contoured close to how you want it- finish the edge with
a good quality file, followed by sharpening stones and high quality sand paper. I
start with a tougher grit and move up to a fine grit until it’s super sharp and highly
polished.
After the blade is done, it’s time to put a handle on it. For my project I chose an
old axe handle. I wanted to have plenty of reach, and be able to get both hands
behind a strong swing. To do this I drilled 2 holes through the handle and the
blade’s handle or tang area. Then I inserted two bolts with nuts and trimmed to
length.
There are better fasteners that you can get at the hardware store for this. If it’s
a handle you’ll be holding onto its important to inset the mounting hardware so
it sits flush. There should be tons of videos on Youtube to show how to make a
nice knife handle. But mine’s purely utilitarian.
It’s a good idea to practice tool making. You never know when you’ll have to rely
on your own ability to make what you need. If you don’t have all the tools for your
project ask someone to help. Metal shops can cut out the blade shape for you
and drill the holes if your equipment isn’t durable enough.
My first attempts at blade making didn’t go very well. It took persistence and
experience before I could turn out anything decent, but eventually I got it nailed down.
Check this out and see what one swing did to a tree limb (golf ball added for size reference):
Have fun with it and show us your creations.
We’d love to see what your imagination dreams up.


