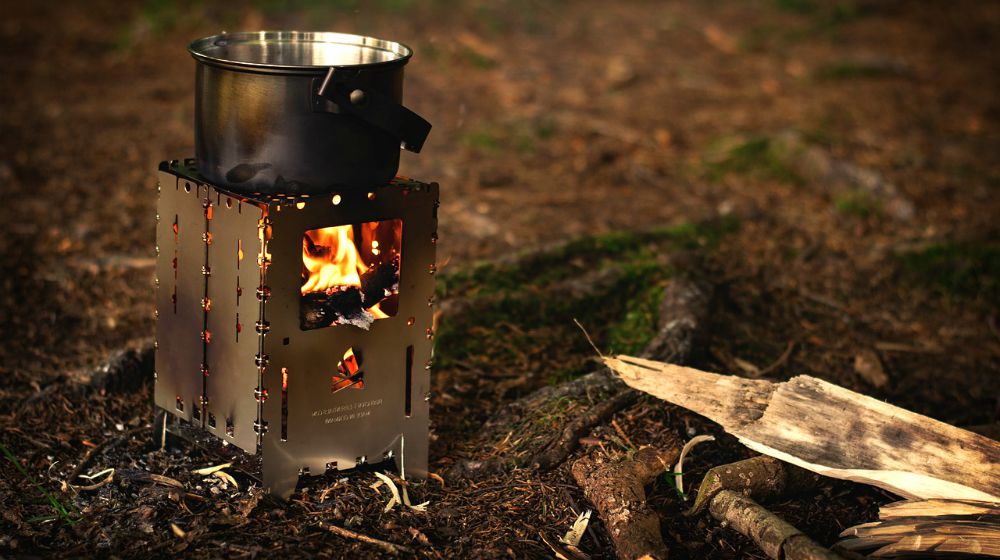
A “hobo stove”(or rocket heater) is an incredibly versatile outdoor cooking tool you can build quickly and easily from scraps you most likely already have around the house. It’s small, lightweight, and because it’s made from scraps it’s easily disposable! If done right, a Hobo stove can be an amazingly efficient outdoor cooking equipment that cooks at insanely high temperatures (you can fry an egg in seconds using only a handful of twigs). Building this tool is a great asset to add to your survival skills and is deceptively simple.
Measure and then cut a piece of flashing that’s 8 inches long. Using the edge of a table or a square edge, bend the flashing into a square or whatever shape you want. This is the feed tube for your heater.
With a pen, trace the edge of your feed tube on the side of the can you will be using as the base. Use your knife to cut the hole in the side of the can by pressing the knife firmly down and through the metal. Once your hole is cut, fit your feed tube into the hole about 1 1/2-inches deep and adjust fit as needed.
Stack your two large cans and measure the distance from the base to the top. You need to allow 1 inch for flow, so subtract one from the measurement of the total height. Measure and cut a piece of flashing from that measurement and roll into a tube. This will be the stand tube.
Place your stand tube on the base of your top can. Then, trace and cut a hole in the base of that can the size of your stand tube.
Check out the full guide to make a “hobo stove ” from scrap here on DIYprojects.com.
Eager to start with your hobo stove plans? Watch the video below from DIY Projects to find out.
There are more than a dozen different versions of rocket stoves available on the market that have a huge range in price. Many of them are big, bulky, and heavy. And let’s face it, when SHTF and you need to be light on your feet, the last thing you’re going to want to carry is a 30-pound stove with you. The great thing about a hobo stove kit is with a little innovation, you can DIY one from some common household items. If you’ve never made one before, you should give it a try. You just need a spare time and some scraps!
Care to share about your own version of a DIY hobo stove? Tell us in the comments section below!
What most people call The Hobo Stove is not exactly accurate. What you have described is an accurate description of the original Hob Stove. I am over 70 years old and grew up in the late 1940’s and early 1950’s near railroads with hundreds of real life ingenious hardscrabble Hobos. The original Hobo Stove did not have a separate fire chamber (a can within a can) that is often described. The Hobo Stove I grew up experiencing, was usually a one pound coffee can with strategically located vents and a fuel-feed aperture. Those men traveling with families usually used a three pound coffee can or (what is now called) No. 10 food can or one-gallon paint can.
Most of them carried a can opener (euphemistically called a “Church Key”), a folding pocket knife, a spoon (and sometimes a fork), a box of strike-anywhere matches, a bedroll, and sundry personal items. The bedroll was usually a Red Cross or military surplus wool blanket. About half of them carried a dedicated cook pot or another coffee can used to cook in. If their cook”pot” did not have a handle, there was usually bailing wire available to form one.
On numerous occasions I witnessed the speedy manufacture of a Hobo Stove in five to ten minutes. The really good ones could do it in three. They would start by cutting an approximately 3 inch hole in the side of the can near the open top. They would then take the “Church Key” and puncture a series of holes around the top sides and in the bottom of the can. Some would puncture the holes around the bottom sides instead of the direct bottom. This difference was usually predicated on the size of cook pot or can used to cook in. The Hobo Stove can was then turned up-side down and the fire started thru the hole in the side
Fuel was usually small branches and twigs. However, they would use anything handy, even your wood furniture if you left anything outside.
I have made something very similar to what you have described. It was actually with my son at a Scouting event called the Klondike Derby. Yes..a large coffee can, no extra can, it was 10 degrees with a wind chill of -2 and snowing and we had a great fried egg breakfast cooked right on top of that can! Thanks for the post!
When I was in Girl Scouts, we had what was called a Buddy Burner to cook on. We would take a large metal can, turn it upside down and punch holes with a manual punch type can opener around the can’s side. We had a smaller tuna fish/chicken type can that we rolled up corrugated cardboard tightly cut just a little taller than the can (for the wick) and placed down in the smaller can. Then we melted Gulf wax and poured into the smaller can on the cardboard, making sure all the corrugated holes were filled with wax. When wax was set you could light the cardboard and set the small can under the larger can and put your cookware on top and cook away. So much fun. Everything seemed to taste so much better. Lots of memories. Faye, Jonesboro, GA
We use cookies to personalize content and ads, to provide social media features and to analyze our traffic. You consent to our cookies if you continue to use our website.
GET YOUR VERTICAL GARDENING REPORT TODAY!
Simply fill-out the form below and subscribe to our weekly newsletter. We strive to help people of all experience levels take steps towards happier, healthier, and more holistic lives with a natural and thoughtful approach to a safer and more effective way of living.
Simply fill-out the form below and subscribe to our weekly newsletter.
Privacy settings
GDPR Compliance
This site uses functional cookies and external scripts to improve your experience. Which cookies and scripts are used and how they impact your visit is specified on the left. You may change your settings at any time. Your choices will not impact your visit.
NOTE: These settings will only apply to the browser and device you are currently using.
This website uses cookies
We use cookies to personalize content and ads, to provide social media features and to analyze our traffic. You consent to our cookies if you continue to use our website.
legal disclaimer https://survivallife.com/data-privacy-addendum/
jimigreyghost
January 10, 2014 at 5:31 PM
What most people call The Hobo Stove is not exactly accurate. What you have described is an accurate description of the original Hob Stove. I am over 70 years old and grew up in the late 1940’s and early 1950’s near railroads with hundreds of real life ingenious hardscrabble Hobos. The original Hobo Stove did not have a separate fire chamber (a can within a can) that is often described. The Hobo Stove I grew up experiencing, was usually a one pound coffee can with strategically located vents and a fuel-feed aperture. Those men traveling with families usually used a three pound coffee can or (what is now called) No. 10 food can or one-gallon paint can.
Most of them carried a can opener (euphemistically called a “Church Key”), a folding pocket knife, a spoon (and sometimes a fork), a box of strike-anywhere matches, a bedroll, and sundry personal items. The bedroll was usually a Red Cross or military surplus wool blanket. About half of them carried a dedicated cook pot or another coffee can used to cook in. If their cook”pot” did not have a handle, there was usually bailing wire available to form one.
On numerous occasions I witnessed the speedy manufacture of a Hobo Stove in five to ten minutes. The really good ones could do it in three. They would start by cutting an approximately 3 inch hole in the side of the can near the open top. They would then take the “Church Key” and puncture a series of holes around the top sides and in the bottom of the can. Some would puncture the holes around the bottom sides instead of the direct bottom. This difference was usually predicated on the size of cook pot or can used to cook in. The Hobo Stove can was then turned up-side down and the fire started thru the hole in the side
Fuel was usually small branches and twigs. However, they would use anything handy, even your wood furniture if you left anything outside.
Bonnie
January 10, 2014 at 8:48 PM
To jimigreyghost:
I have made something very similar to what you have described. It was actually with my son at a Scouting event called the Klondike Derby. Yes..a large coffee can, no extra can, it was 10 degrees with a wind chill of -2 and snowing and we had a great fried egg breakfast cooked right on top of that can! Thanks for the post!
Jeffrey Bonneville
January 10, 2014 at 8:44 PM
Thanks for the demo
Faye Coleman
June 15, 2018 at 4:38 PM
When I was in Girl Scouts, we had what was called a Buddy Burner to cook on. We would take a large metal can, turn it upside down and punch holes with a manual punch type can opener around the can’s side. We had a smaller tuna fish/chicken type can that we rolled up corrugated cardboard tightly cut just a little taller than the can (for the wick) and placed down in the smaller can. Then we melted Gulf wax and poured into the smaller can on the cardboard, making sure all the corrugated holes were filled with wax. When wax was set you could light the cardboard and set the small can under the larger can and put your cookware on top and cook away. So much fun. Everything seemed to taste so much better. Lots of memories. Faye, Jonesboro, GA
Pingback: [Video Quick Tip] How To Make A “Hobo Stove “From Scrap