Connect with us
[elementor-template id="151043"]

Do It Yourself

How To Fix A Broken Zipper In Four Simple Steps

Published

on

Feature | How To Fix A Broken Zipper In Four Simple Steps

Learning how to fix a broken zipper is one of the life skills that make homesteading or survival manageable.

How to Fix a Broken Zipper in a Jiffy

Why You Should Learn How to Fix a Zipper

Knowing how to fix a broken zipper is a skill people take for granted. When a zipper keeps pulling apart, many go to a tailor right away. They are more than happy to spend money to have someone fix a little trouble.

If not for the tailor, I know these clothes will never see the light of day again. Most probably, they will go straight to the trash or to a donation box. Well, you never have to let these things happen again when you learn how to sew and how to repair a zipper.
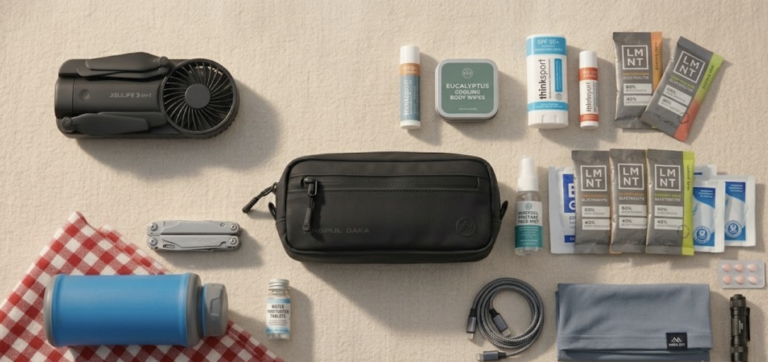
You Will Need

  • A pair of pliers
  • Scissors
  • Thick thread (thicker than a regular sewing thread, often used for buttons)
  • Needle

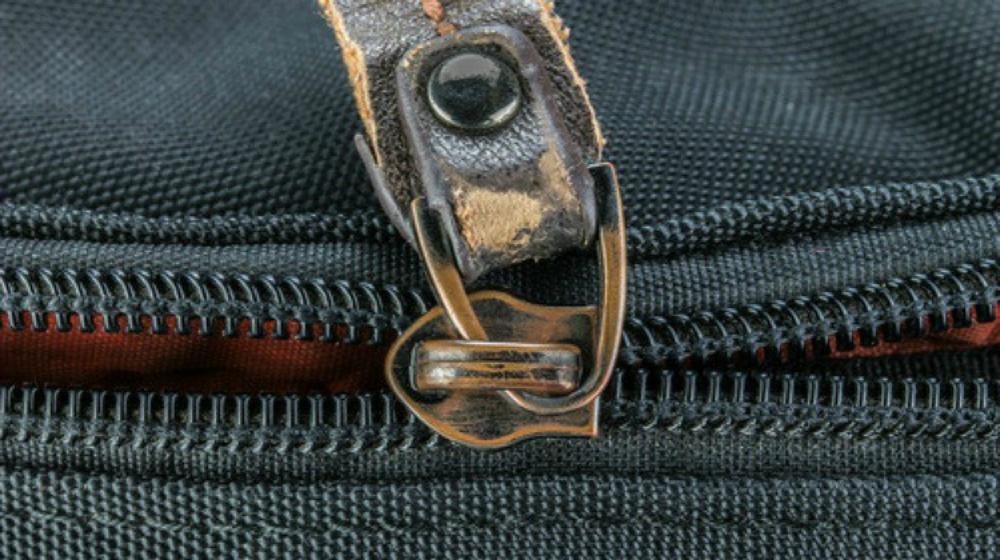
Step 1: Remove the Bumper

The first step to learning how to fix a broken zipper is to grab the pliers. Detach the metal bumper from the bottom of the zipper.

With a little bit of muscle, you’ll be able to do it. Pull the zipper down. Stop just before you reach the last teeth. Don’t remove the zipper completely.

Step 2: Arrange the Teeth

Know how to realign a zipper. Using your hands, straighten out the teeth. The goal here is to remove all sticky teeth on one side of it.

After doing this, you may now pull the zipper up, stopping halfway. Watch out for locked teeth. Fix them as you go along.

Step 3: Stitch It Up

Now, stitch up the spot where the metal bumper used to be. A thread should now be in its place. Note, though, this isn’t an ordinary thread.

It needs to withstand pressure and strain, which were the problems, to begin with. At least six stitches should replace your metal bumper. So sew as much as you need to achieve this.

Take your time sewing and use as much thread as you need until the replacement thread is strong enough to last another round of wear and tear. Finish it off by tying a thread into a knot on the zipper’s back side.

Step 4: Zip It Up

Now, your zipper is good to go! Pulling it up should feel as smooth as a brand-new purchase. You should have no more failed attempts at tugging at that zipper.

Since you can’t avoid accidents forever, here’s an easy remedy in case it happens again. Use a seam ripper (or any razor blade should work) to undo the stitching. Repeat the steps on how to fix a broken zipper.

Check out this video from TVProductsUSA for more tips on how to fix broken zippers:

Knowing how to fix a broken zipper isn’t as grand as learning the skills to survive terrorist attacks or other tragedies. It will help you get quite a bit more mileage out of your clothing, though.

It alone will save you a ton of money in the long run. When the stores aren’t open, a zipper in good condition can keep you fully clothed! You can repair your backpack straps while in the outdoors, too. To be always ready for it, I recommend keeping a zipper pull repair kit in the house or car at all times.

Do you have other handy tips on how to fix a broken zipper? Let us know in the comments section below!

Up Next: 83 Uses For Paracord That Will Surprise You

Follow us on FacebookInstagram, Twitter, and Pinterest!

Disclaimer: All content on this site is for informational purposes only. Please read our full disclaimer here.

Placard | How To Fix A Broken Zipper In Four Simple Steps

Editor’s Note: This post was first published in August 2013 and has been updated for quality and relevancy.

Continue Reading
20 Comments

20 Comments

  1. Mark

    August 23, 2013 at 11:38 AM

    Thanks Joe. Wish I had known this, thought of it, years ago, thinking of all the jeans I threw away. Makes me feel dumb now :-/

    • Linda Guyan

      August 30, 2013 at 10:36 PM

      I knew the concept from somewhere in my youth but I’d never seen it done and wouldn’t try anything since lining up the teeth seemed impossible for me. Thanks from the bottom of my heart for the instructions and the pictures. I now believe that I could fix any zipper that comes my way. Because what is really hard is to replace a broken zipper especially when the zipper is unaccessible due to lining, pockets etc. Usually I would just take it to the shoe repair store or a dry cleaners who hire very good seamstresses. Cost thought. Another hint if you really want the zipper replaced remember that their might be a need to buy 2 zippers to make them match. I always would buy my own replacement zippers so I could guarantee the quality. Kind of like buying Sears Craftsman. You will care if you don’t.

  2. Jane

    August 23, 2013 at 12:02 PM

    Ok. This will probably work — for the few occasions where a simple misalignment of the teeth is the only problem. It’s an oversimplification to think that all zipper problems can be solved in this way. Many times, one or more teeth actually get torn out of the zipper tape–making this method unusable. In that instance, a complete replacement of the zipper would be required. Another common problem with zippers is the loss of the pull tab. I’ve used twisted wire or a small key ring on jackets to solve that problem.

    Get a good sewing guide that includes repair techniques. [Reader’s Digest puts one out, or used to.] I recommend practicing on something damaged, that’s in your closet now, so you know what to do in a real difficulty. Also, you would need to have replacement zippers available for the times when a simple fix won’t solve the real problem.

    • Anonymous

      June 19, 2019 at 9:37 AM

      A large paperclip works great as a zipper pull. You can even remove it and use as a fish hook if needed.

  3. texastwin827

    August 23, 2013 at 2:04 PM

    I agree with Jane. This method is a temporary method and does not fit every situation. I am the last in my family that knows how to sew so I have my teenaged granddaughters give me their old jeans that are not donate-able and then I remove the zipper for use in a pair, when they break one.

    I do the same thing with shirts that are not suitable for donating. I remove all of the buttons for use on another shirt. If you lose a button, at the worst, you can always remove the remaining original buttons and replace them with ones that have come off another shirt.

    Also, while an old fashioned treadle machine would be ideal, any electric sewing machine can be operated manually (not fun) and it makes more secure stitches than hand sewing a garment would.

    Anyone with young children should visit garage sales and look for large sized clothing (shirts, dresses, jeans) because most times there is enough fabric in large sized clothing to make clothes for children, especially since they grow out of theirs so fast.

    • Lucille Gherardini

      August 23, 2013 at 8:10 PM

      Excellent wish Ihad thought of that, will remember in the future. I do save buttons, that comes from my Granmother.

  4. texastwin827

    August 23, 2013 at 2:09 PM

    For non experienced sewing, I would suggest buying 1 EACH of shirt, pants & dress patterns for family members. Also perhaps a coat pattern. There are “Easy to Sew” patterns for novices and most patterns, today, have multiple sizes included so, for children, that is ideal as it covers their growth spurts.

  5. Cynthia

    August 23, 2013 at 4:18 PM

    Zipper Fix: Another method(2)of fixing a broken zipper is to “lace” back together. This method was used long ago before the zipper came along. There are two ways to complete.#1-Use a single hole punch or utility/survival knife to punch holes along the very edge(in about 1/4″ of original zipper & 1/4″ apart. Use a heavy boot lace/shoe string. Lace up just like a boot or shoe.#2-The broken zipper can be removed,carefully, so the fold of original zipper is in tack. Align fabric/jeans in place, overlapping, then punch holes(thru both layers),repeat steps from #1.Then lace up like a boot/shoe. Works great with anything that needs a closure;bags, shirts, etc. Keep Carpet thread & carpet needle in fix-it container(I use an empty prescrition bottle),this needle is a heavy half-moon shape for easy sewing & the thread is very thick with water guard to prevent decay/shredding. Hope this helps as an alternative method.

  6. MI Patriot

    August 23, 2013 at 4:46 PM

    Unfortunately this will only work for metal zippers. The cheap nylon ones are made of a spiral of plastic. If you try to fix them like this, you will end up with a long thin strip of kinked plastic.

    Jane, if your zipper teeth are broken you can fix it too. It’s not foolproof or pretty, but in a pinch it would work. Take a pair of pliers and pull off the broken teeth. You leave your zipper zipped up and take your heavy thread. (I’ve used dental floss). You sew around the zipper just above the broken teeth. You are essentially making a thread version of the little metal piece that holds your zipper together at the bottom. Make sure it’s big enough to keep your zipper from going over it. You will still be able to use your zipper.

    Bobby pins and safety pins also work great for emergency zipper pulls.

  7. Rita

    August 23, 2013 at 7:56 PM

    was a seamstress for a while and yes, this is the right way….if you can get to the back of the metal stop and carefully pry up the metal prongs (use a metal nailfile) and then pull the metal stop out….then after fixing the zipper teeth and slide you can replace the stop and fold back the metal prongs, if the metal prongs on the other side of the stop are not too weak or break off !! Have repaired a number of zippers this way. You can always use the needle and thread if this fails. This might save some time and sewing!

  8. Lucille Gherardini

    August 23, 2013 at 8:02 PM

    It seems in the market today very few zippers are metal. I have two all most new good winter jackets and the plastic pull tabs quit working. Replacing the zippers not sure if they are worth it.

    • Carol Tarpley

      September 11, 2019 at 12:34 PM

      The zipper on my favorite jacket broke, so I bought a replacement zipper and sewed the new zipper beside the broken one – didn’t remove the broken zipper. New one works great.

  9. Chuck

    August 23, 2013 at 10:53 PM

    A shoe repair shop in town also does zipper repair. That won’t help you in a life altering situation, but check shoe repair shops in your town. You can salvage an expensive jacket if you find a shoe repair shop that fixes zippers. I have heard that some sporting goods shops also fix zippers so that you don’t have to throw that expensive tent away just because the zipper went south. Other than, perhaps, REI, I don’t think major chains stores do that kind of work, but large independent stores may.

  10. Debbie

    August 23, 2013 at 11:20 PM

    I learned how to sew and use a sewing machine when I was eight years old. Being petite for all my life, my sewing skills came in handy many times. In addition, I’ve been able to teach the skills to others, even if it’s only teaching them how to sew on buttons or darn socks. Westerners are sure a spoiled lot. This ‘use and then replace’ mentality in our society is most definitely a problem that may contribute to whipping up panic in people when there are no more ‘replacements’ to purchase. ‘Better learn some handy skills now!

  11. MARKWW

    November 17, 2013 at 9:28 AM

    Velcro Make then zip apart

  12. JCBParodi

    December 6, 2013 at 5:07 PM

    Also should probably cover how easily the fly can be converted from zip to buttons at some point… especially as it allows the decided advantage of being quieter.

  13. HobartHomemaker

    September 26, 2014 at 7:20 AM

    I had a zipper on my son’s dress pants that was beyond repair. It was a cheap, flimsy plastic zipper. I cut off the teeth of the zipper and as much of the zipper fabric as I could without compromising the pants’ material, then I took the front section of material from the left pocket (about 1 1/2″ x the length of the pocket) and sewed the top and each of the sides, turned it right side out and added two button holes. Then I sewed it just inside the zipper flap (on the top, bottom and inside edge – leaving the outer edge free for easy buttoning) and added two buttons. They are now button-up pants, but look the same as a zipper would. This was the only option for me as the zipper was beyond repair and I do not love sewing zippers. [His left pocket is now very narrow, but he doesn’t really use his dress pants pockets for anything anyway. :)]

  14. Pingback: How To Fix A Broken Zipper In Four Simple Steps | Life Off The Grid

  15. Lund Tonneau

    January 7, 2019 at 12:06 AM

    Those are good tricks to repair the zipper. I usually take the pants and jacket to the tailor shop for zipper repairs, I might try to fix them next time.

  16. Larry Eccleston

    September 11, 2019 at 11:16 AM

    I have performed this operation quite a few times in my life. It gives added life to a garment, suitcase or other zippered item. Certainly worth the effort.

Leave a Reply

Your email address will not be published. Required fields are marked *

Trending

Copyright © 2020 Survival Life. This copyrighted material may not be republished without express permission. The information presented here is for general educational purposes only. MATERIAL CONNECTION DISCLOSURE: You should assume that this website has an affiliate relationship and/or another material connection to the persons or businesses mentioned in or linked to from this page and may receive commissions from purchases you make on subsequent web sites. You should not rely solely on information contained in this website to evaluate the product or service being endorsed. Always exercise due diligence before purchasing any product or service. This website contains advertisements.