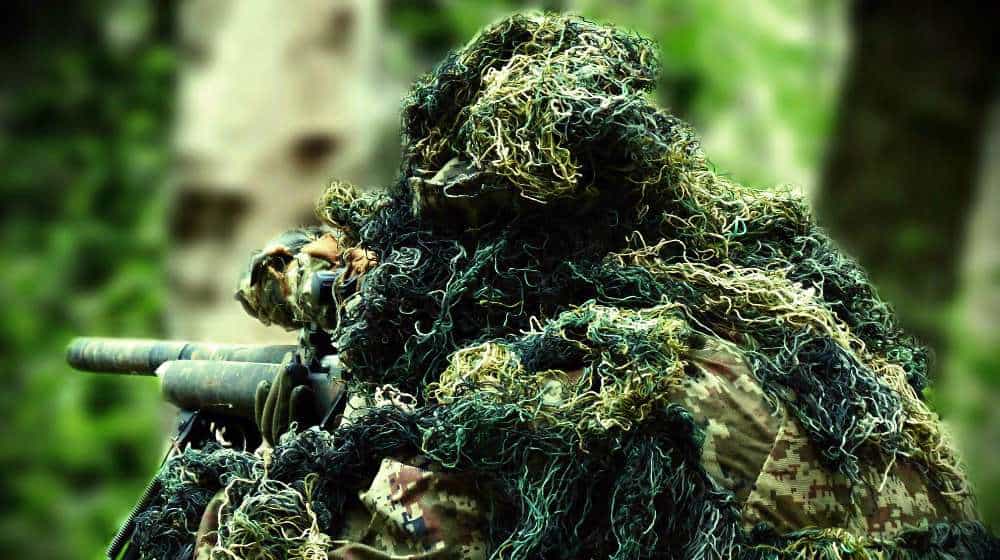


A perfect camouflage suit will let you seamlessly blend with your surroundings. Even though you can buy camo clothing and ghillie suits from supply stores, making your own will save you money and allow you to customize it. The primary role of ghillie suits is to disguise you and keep you hidden in plain sight. Hardcore hunters, snipers, undercover surveillants, and airsoft enthusiasts use camouflage to make them invisible to their targets and allow them to move freely without difficulty. Also, wearing camouflage colors plays a major role in escaping dangerous and life-threatening situations. With all this in mind, if you want your own ghillie suit, put those hands to work and follow these steps to make a camo suit!
Camouflage: This Ghillie Suit Will Keep You Hidden
What You’ll Need:
- Burlap (big enough to wrap your whole body)
- Camouflage jacket and pants/coverall
- Camouflage hat
- Fabric Dyes (color should match your surroundings)
- Netting (volleyball net or a fishing net)
- Shoe glue
Step 1: Add the Netting

Lay the camouflage jacket, pants or coverall, and hat onto the netting. Once the suit is covered by the netting, attach the netting using the shoe glue and let it dry. Go to different spots and pull up the netting. If it goes further than two inches up, you have to add more shoe glue in there. Make sure the netting will stick well to your suit, especially on the edges. Further, make sure you still have access to the pockets you need to use. After, cut off the excess netting.
Step 2: Separate the Strands

Preparing the burlap or jute fibers is the most time-consuming part of making a ghillie suit. Cut strips of burlap, then separate the strings one by one. Longer strands will go on the sleeves, while the shorter ones will overlap down the back.
Step 3: Dye the Burlap

After you have several mountains of jute, the next step is soaking it in fabric dye. Remember the color of the dye should match the environment you’ll work in. A combination of tan, dark and light green and brown will usually match well. Get a tub, fill it with water, and put in the fabric dye. Put the jute in the tub and soak it. Once the jute absorbs the dye, take it out of the tub and let it dry.
Step 4: Tie the Burlap

Now, it’s time to tie the strands of the burlap into the netting. Take about ten to fifteen strands, then fold them in half and push the loop under each square of the netting. Draw the hanging ends of the strands through the loops and pull them tight. Start from the bottom and work your way upwards. Make sure all the colors are spread out.
No products found.
When all the jute are tied to the netting, your suit is done! Go out into the woods and test your new ghillie suit. By doing this, you will also figure out if there are changes and improvements you need to make.
Points to Remember
Without shelter, you won’t last long in the wild. Conquering the Cornerstones: Shelter – the 1st Pillar of Survival https://t.co/NKJgwqfN9L
— Survival Life (@SurvivalLF) October 4, 2017
Here are some points to remember when making an ideal ghillie suit.
- If you cover too much of the front part of your suit, it will make crawling difficult.
- More burlap means a heavier and hotter suit, but you also get more camouflage.
- For you to blend in more with your surroundings, incorporate natural vegetation into your suit. A good ghillie suit has 65% natural vegetation and 35% burlap or jute.
- Exposing your suit to water, dirt, and sunlight for long periods will make the individual fibers less noticeable, and your suit will become more camouflaged.
- Use gloves, face paint, and boots with environmental colors for better concealment.
Looking for more camouflage suits? Watch this video from Ezvid Wiki and find out the best ghillie suits you can get on the market!
Wearing a camouflage suit will help you blend in with your surroundings. This will help you move freely without your target knowing you’re there, which is crucial in escaping a dangerous situation. Remember, the suit needs to be light and allow the air to circulate. Also, it should be made with quality materials to make sure it won’t fall apart when you’re in the field. You can add foliage such as twigs or leaves to enhance your suit, so you can blend in better with your surroundings.

- [Material] Bulk roll camouflage netting made entirely of polyester that is waterproof, lightweight, and concealed.
- [Design] The camouflage coloring pattern maximizes concealment in the field while permitting outstanding views of the...
Last update on 2026-07-11 / Affiliate links / Images from Amazon Product Advertising API

Have you tried making your own camouflage suit? How is it working for you? Share your experiences with us in the comments section below!
UP NEXT: 5 Ways To Maximize Camouflage Concealment
![]()
Follow us on Facebook, Instagram, Twitter, Tumblr, and Pinterest!
**Disclaimer: All content on this site is for informational purposes only. Please read our full disclaimer here**
Editor’s Note – This post was originally published in October 2017 and has been updated for quality and relevancy.