Archives
Building a Target First Aid Kit: Part 3
In parts one and two, we discussed what a first aid kit is, and started to populate it with the broadest category of first aid supplies; that is, for treating penetrations of the skin.
Building a Target First Aid Kit: Part 3
In this part, we will look at a number of other hopefully minor problems and the first aid kit supplies appropriate for them. The numbers after the problem will be used as a shortcut to indicate for which problem(s) an item in the summary list is used for.
Splinters [2]
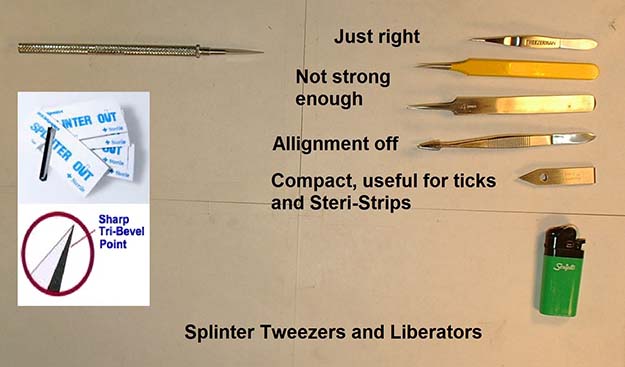
Generally we think of splinters as a sliver of wood which gets imbedded into the skin at or near to the surface. For the purposes of first aid, we will also include slivers of metal or plastic, spines and thorns, fragments of glass, or even small birdshot as long as it is at or just under the surface. There are two schools of splinter treatment, the “needle” school and the “tweezers” school. The needle or other sharp pointed instrument is used in an attempt to drag out the splinter. This can work for wood, as long as it holds together. It is less effective against metal and other impenetrable splinters. With the tweezers, which need to be the right combination of fine point, correct alignment and strength, you just grab the end of the splinter and pull it out. Many of the tweezers available have too broad a point, are not aligned quite correctly, or don’t have the strength to hold onto the splinter. Tweezerman point tweezerettes seem to be a good choice, although the price is higher than run of the mill tweezers.
Of course, in both types of treatment, there is a problem – you have to have access to the end of the splinter for it to work. If it is below the skin, that is not the case. In order to expose (“liberate”) the end, you will need to peel back or remove a bit of the skin from around the splinter, following the path the splinter took. This can be done with the needle, a tip of the tweezers if they are sharp enough, or a separate splinter instrument which is kind of like a big needle with sharpened edges. These don’t seem to have a specific name; I’ve seen them called splinter “out”, “liberator”, “remover”, “pick”, “extractor” and “probe”, and are available as reusable instruments or single use/disposable ones.
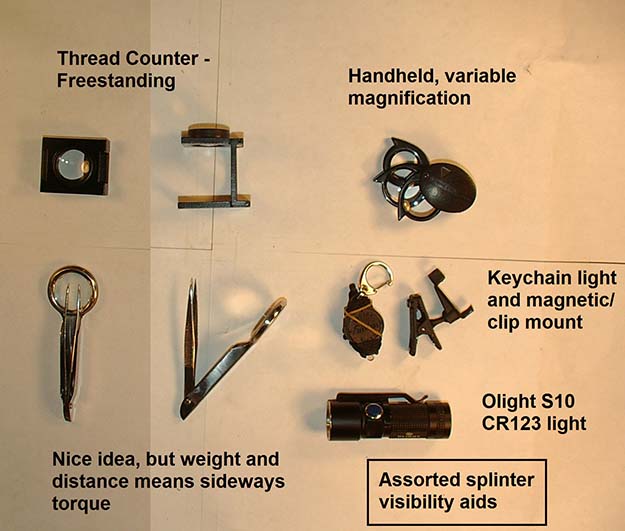
Magnification and light is often extremely helpful when removing splinters. Any type of high powered magnifier will do if you are working on someone else, but if you are trying to take a splinter from your own finger, a “hands free” magnifier is much easier. Choices include a visor or stand (neither practical in a small kit), clip on (if you wear glasses), an eye loupe, a magnifier mounted on the tweezers (I find these to be hard to use due to the sideways torque applied by the magnifier) or a small, folding, free standing magnifier (called a thread counter or linen tester). As for light, a useful one will generally need to have batteries, which can die or leak while in storage, so they will need to be checked every so often. The light should be small and moderately bright, so consider one using a single AA, AAA or CR123 battery. Lithium batteries tend to last longer in storage. Another option would be a “keychain” light powered by “watch” batteries. My favorite is the L.R.I. Photon Freedom, because it is small, very durable, water resistant, has easy battery replacement, infinitely variable brightness, a clip in cradle which prevents activation in storage, and a mounting accessory which allows you to mount the light to an iron surface or clip it to your hat or clothing. Of course, it also has a high price.
Once the splinter is removed, you have the situation of penetrated skin to deal with, as discussed in part 1. In order to not add to any infection introduced by the splinter itself, make sure your hands and the surrounding area is clean and disinfected, and all your instruments are sterilized by boiling, burning in a flame or dipping into or wiping with a disinfectant.
Minor Burns [3]
You are probably aware of the classic three classes of burns. Some people claim there are four or even five. They are:
First degree:
- Includes only the outer layer of skin, the epidermis
- Skin is usually red and very painful
- Equivalent to superficial sunburn without blisters
- Dry in appearance
Second degree:
- Partial thickness
- Blisters can be present
- Involve the entire epidermis and upper layers of the dermis
- Wound will be pink, red in color, painful and wet appearing
- Wound will blanch when pressure is applied
- Full thickness
- Can be red or white in appearance, but will appear dry.
- Involves the destruction of the entire epidermis and most of the dermis
- Sensation can be present, but diminished
- Blanching is sluggish or absent
Third degree:
- All layers of the skin is destroyed
- Extend into the subcutaneous tissues
- Areas can appear, black or white and will be dry
- Can appear leathery in texture
- Will not blanch when pressure is applied
Fouth degree:
- All layers of the skin and at least some subcutaneous tissue is destroyed
- Extend into the muscle and even bone
We will consider a “minor” burn to be a First degree, or Partial Thickness Second degree over a small area. Anything else will be considered a “major” burn and is best addressed by advanced medical treatment. Burns can be caused by heat, contact with hot liquids or solids, ultra violet and other radiation, electricity, fire and chemicals. Chemical burns should not have any cream/lotion/ointment applied until the chemical is removed, as there could be a chemical reaction between the cream and the chemical. Electrical burns should be considered potentially serious even if they don’t appear very severe, as there may be internal damage not visible from the outside.
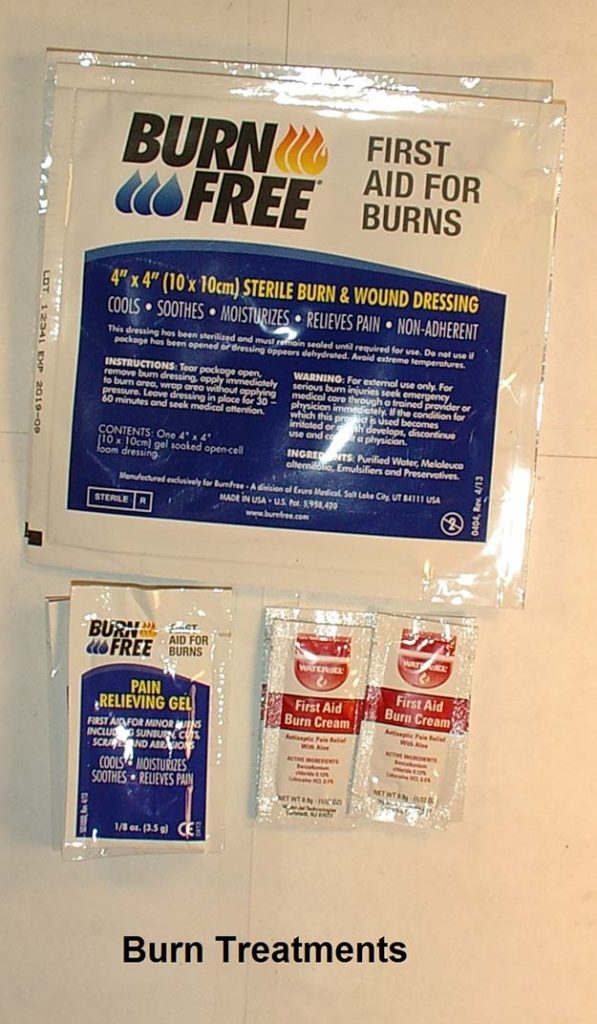
Whenever dealing with burns, the immediate response is to immerse the burn in cool, clean water, to stop any further progression of damage. This is not practical to provide for in a first aid kit, and actually can be dangerous to the victim, particularly in serious cases, by encouraging hypothermia and/or shock. There are lines of gel products, such as Burn Free, which are not only more portable than a bunch of water, but less risky as well. The product cools the burn to minimize further damage, and covers the exposed, damaged nerve endings to reduce the pain. Once the burn progression is stopped, and the pain is under control, treatment is focused on avoiding infection and encouraging healing.
There is not much equipment needed for a first degree burn. The most common cause is UV from sunlight (sunburn), and a case could be made that including sunscreen in the kit is appropriate, even though it is “prevention” rather than “first aid”. Pretty much the items indicated for treatment are an aloe vera (or other soothing) cream for comfort, and a dry gauze bandage applied loosely to protect the area and keep the air off of it. Even though with no break in the skin, infection is not a concern, antibiotic ointment can be applied for some comfort if no pain specific cream is available. There are some burn sprays and creams which include a topical anesthetic (often Lidocaine) which may provide good pain relief, but can also cause allergic reactions, particularly in children.
For a partial thickness second degree burn which is confined to a small area, the equipment needed for treatment is a way to wet it for a few minutes each day (gauze sponges work well), antibiotic ointment, pain control and dressings. If any of the blisters break, treat as for any other skin penetration.
Insect Bites and Stings [4]
Many insects have effects which are irritating or painful. Those which are actually life-threatening need more advanced medical treatment. Bites and stings both penetrate the skin, so the possible problems include bacteria, viruses or parasites, as well as an irritant or a small amount of venom.
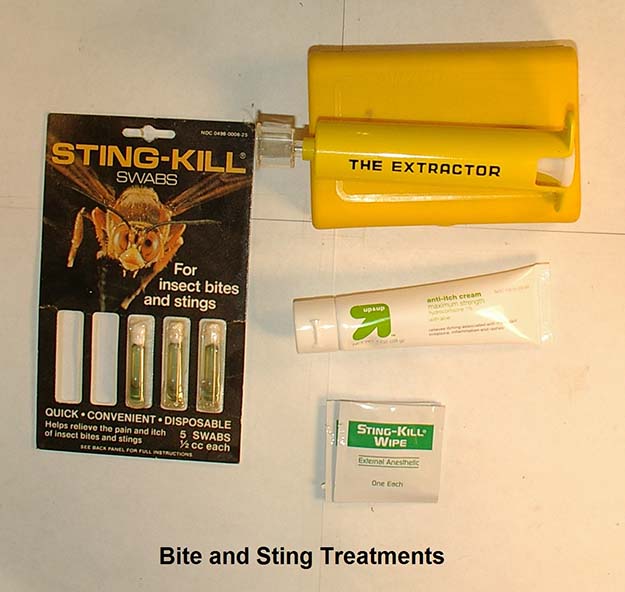
An insect bite is a penetration of the skin by the teeth or “mouth” of the insect; a sting is also a penetration, but by a “stinger” or spine designed to deliver venom. The stinger may or may not be left behind; if it is, do NOT grab it, as that could squeeze more venom into the wound. Rather, “scrape” it out with a credit card, long fingernail or other sharp edge. A Sawyer Extractor may suck out some of the venom, but this is usually not important enough to try to fit one of these into a small kit, unless allergy to bee stings is a consideration. In the case of an embedded tick, use your fine tip splinter tweezers to grab the head and work it out.
In addition to whatever pain is generated by the skin penetration, the irritant can cause itching or the venom can add substantial additional pain. Diphenhydramine (an anti-histamine) or hydrocortisone (a steroid) cream can help with itching. Calamine lotion is obnoxious to carry and use (it is a staining, hardening, liquid), but also is effective at relieving itch. As for pain, a cream containing a topical anesthetic can be helpful. Lidocaine is good and fairly easy to find. Pramoxine (aka Pramocaine) is better, but harder to find except in hemorrhoid products. There is a product called “Sting-Kill” containing Benzocaine which is specifically marketed for dulling the pain of bee stings and the like, available in wipes and individual ampoules, thus a good choice for the kit.
Make sure you are aware of all the ingredients in whichever products you choose; all of the ones listed have risk of allergic reaction and serious problems from overdosing.
Other than dealing with the discomfort, treat like any other skin penetration.
Blisters [5]
Blisters can be caused by friction, most commonly on the feet or hands. If you sense a blister starting, a piece of moleskin can be stuck to what is rubbing on you to provide protection between your skin and the source of friction. Or you can cover the “hot spot” with moleskin, hypoallergenic silk tape, Second Skin blister pads or even a Band-aid if that is all that is available. Once the blister has formed, it is better to leave it intact, to prevent infection. To provide additional protection to a friction blister, you can cut a piece of moleskin with a hole in it (a “donut”) to fit around the blister. However, if it is too painful or too likely to be burst by continuing activity, you can drain the blister by disinfecting the blister and a needle, safety pin or splinter extractor, and poking a hole at the base of the blister and letting it drain, pressing gently to help clear out all liquid. In this case or if it has burst “on its own”, then treat like any other skin penetration.
Second degree burns or frostbite can result in blisters which should be kept from bursting if practical and not deliberately drained, but otherwise are similar to friction blisters. Blisters from spider bites need advanced medical treatment. Blisters from various illnesses should be considered to be contagious.
Rashes and other skin problems [6]
Rashes can be caused by contact with plants (poison ivy, poison oak, etc) as well as allergic reactions to exposure to the allergen either externally or internally. Heat rash can occur in folds of the skin where moisture and friction combine to make the skin raw, or as “prickly heat”, lots of bumps caused by blocked sweat glands. Numerous illnesses and physical problems, minor and severe, can cause rashes, hives or similar skin problems. Note that even trained doctors can have a hard time determining the type and cause of rashes from the rash alone. From a first aid standpoint, pretty much all we can do is just treat the symptoms.
Generally a rash will be one or more of red, painful, itchy, spots, bumps or scaly. Of course, the first thing to do if contact with an irritant or allergen is suspected is to clean off the area, as well as any clothing or equipment also exposed. Apply hydrocortosone cream to help with the itching. If an allergic reaction is suspected, an oral antihistamine such as Diphenhydramine (Benadryl) may help. If the bumps are ruptured or torn open, treat like any other skin penetration.
The lips are particularly subject to chapping, cracking and other exposure problems. A tube of Chap Stick, Carmex or other lip balm would be a good addition to the kit.
Summary of these
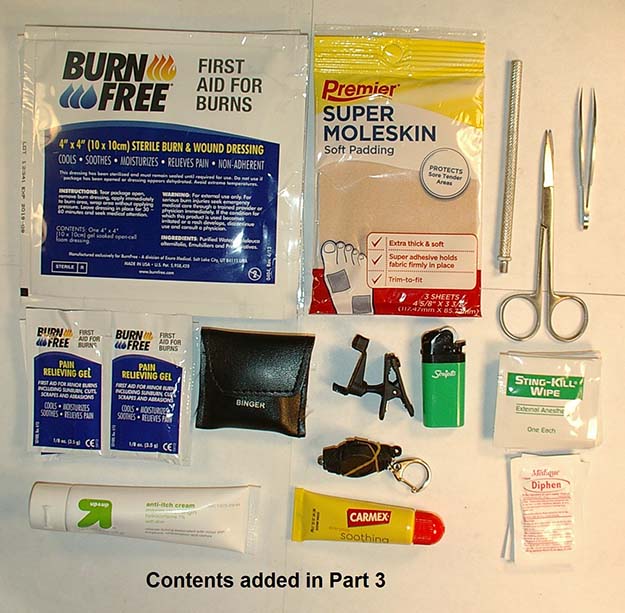
My contents list to cover this (* indicates part of the sale)
[The number under “Uses” refers to the number(s) listed after the problem(s) to indicate which are addressed by the item]
| Part of Sale? | # | Item | Alternatives (Notes) | Uses |
| 1 | Magnum Splinter Extractor/Liberator | or needle or Splinter Out | 2, 5 | |
| 1 | Tweezerman Point Tweezerette | or point tweezers or splinter tweezers | 2, 4 | |
| 1 | Binger 8x Folding Linen Tester | or other magnifier (Can replace Fresnel lens for reading meds instructions) | 2 | |
| 1 | LRI Photon Freedom micro keychain light | or single AAA or AA or CR123 light | 2 | |
| 1 | Scripto Tini Lite Lighter | or Bic Mini (For sterilizing instruments) | 2, 5, 9 | |
| 4 | Burn Free Gel Individual Pouch | 3 | ||
| 2 | Burn Free 4″ x 4″ Pad | 3 | ||
| 0 | Burn Free 8″ x 8″ Pad | (Too big for my case) | 3 | |
| 4 | Sting-Kill Towelette/Wipe | or ampoule | 4 | |
| 0 | Sawyer Extractor | (Too big for my case) | 4 | |
| yes | 1 | Up&Up 1 oz Tube Hydrocortosone | or diphenhydromine or calimine lotion | 4, 6 |
| 1 | Premier 4 5/8″ x 3 3/8″ Moleskin, 3 pack | or Second Skin or silk tape | 5 | |
| 1 | Avon 4.5″ Iris Scissors | or other small scissors or razor knife | 5 | |
| 1 | Carmex tube | or Chap Stick or lip balm | 6 | |
| 2 | Medique Diphen 25mg caplet packet | or other diphenhydramine | 6, 18 |
In this list, the items are fairly comprehensive, but some of the numbers are a bit small since I spread the products purchased over 4 first aid kits. Adjust the numbers to your preferences and situation.
So far in Parts 2 and 3, we have considered first aid for problems primarily resulting from external events. In Part 4, we will finish up this class of problems.
First Aid Kit List
Must-Have First Aid Kit Contents
The Ultimate Emergency First Aid Kit List And Tips
-

 Do It Yourself7 months ago
Paracord Projects | 36 Cool Paracord Ideas For Your Paracord Survival Projects
-

 Do It Yourself9 months ago
How To Make Paracord Survival Bracelets | DIY Survival Prepping
-

 Do It Yourself9 months ago
21 Home Remedies For Toothache Pain Relief
-

 Do It Yourself10 months ago
Survival DIY: How To Melt Aluminum Cans For Casting
-

 Exports8 months ago
Are Switchblades Legal? Knife Laws By State




Pingback: Building a Target First Aid Kit (Part 1) | Survival Life
Pingback: How to Make Proper First Aid Kit | Survival Life