Do It Yourself
How to Make a DIY Primitive Burn Bowl
A Water Purification Technique You Can Use Anywhere
Today I’m going to show you how to make this really cool primitive bowl using fire (and coals from our fire) and a knife. We’re using a piece of oak in this tutorial, so it will take a long time to do.
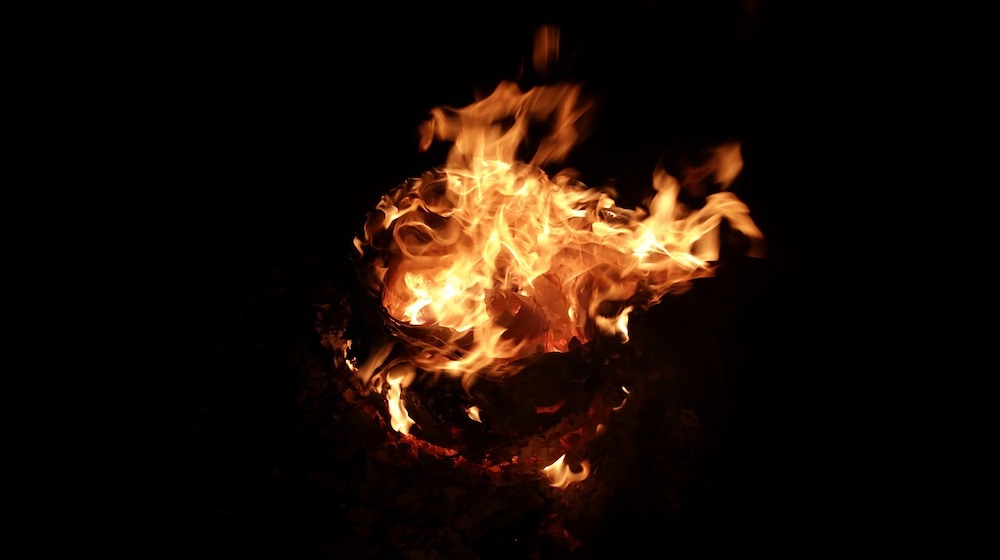
Like any project, before you begin, you’re going to need the proper tools. One of the most important tools for the burn bowl is our fire. I have a bunch of wood on there, just waiting for it to burn down to coals. We need to keep feeding it.
Next you’re going to need a big piece of wood, such as a log.
You’re going to need two knives. First, you’ll need a crooked knife like the one shown below. This is a great tool for getting in there (carving.)
You’re also going to need a conventional knife.
A shovel is also necessary to be able to put the coals onto the wood. The coals are very hot and a shovel will ensure that you don’t get burned in the process.
How to Make a Burn Bowl
Now that we got a little bit of fire going on here, we have some coals. I’m going to take my block of wood. It’s really important that you have a flat top on the wood. If it’s a domed wood, you’ll have to carve it flat; otherwise the coals will fall right off.
Please be careful if you try this at home without an instructor present. These are hot coals and you can get burned. I’m going to dig into my wood while the fire is going. Choose some coals and drop them on top of the block of wood.
With the embers and coals on, we are going to make sure they are stacked up.
The embers are going to eat or burn the inside center of the wood. This takes time, so if you want to you can give it a blow. If you have a straw, you can use it to help the coals along.
After a little while with the coals being on, you can see a little circle. I’m going to put my hands around the coals and give them a little breath.
The coals will become hotter and sometimes they catch fire, which is fine as long as it is good and controlled.
The process here is that the center of the bowl is starting to be eaten out by the fire. Later on we are going to carve the middle with the crooked knife and remove the carbon, ash and coals. What you get is a functional bowl.
To make sure that the bowl ends up going down and not out, I dump my coals back into the fire and I’m left with these charred embers.
Now I’m going to take this crooked knife and I’m going to help it along a little. I’m going to remove these old coals using the blade side of the knife, and start doing some carving.
We haven’t burned through too many layers because this is a thick piece of hard wood.
We want to make sure the coals get hot. If the wood catches fire, that is okay, just make sure the fire does not spread all over. To keep it under control, dab the edges with water.
Give the coals some time to carve the wood out, then use the crooked knife again to remove as much of the material as you can.
This way we can shape the bowl the way it’s supposed to. You can use a straight knife to do this but it will be difficult, especially around the edges. A crooked knife is preferred.
You can see the bare wood coming out and that’s really great.
Now that it’s starting to look like a bowl, it’s time to add more coals.
Let the coals burn out on the wood, scrape and then repeat.
When it reaches the depth you want, it’s time to do the finishing touches on the bowl with the crooked knife.
Use the straight knife to clean up the sides. Smooth out the edges and you’re done.
Watch the video below for the full tutorial by YouTuber baref00tbushcraft.
How did you like our DIY burn bowl tutorial? Have you ever made a burn bowl yourself? Tell us about your experience in the comments!
Your burn bowl will enable you to boil water in the wilderness in order to make it safe to drink. This is a vital skill for any survival situation. Click here to learn more about the importance of purifying water.
![Feature | Men's wearing black drinking water in the mountain | How To Stay Hydrated While Hiking [ Video]](https://survivallife.com/wp-content/uploads/2016/05/Mens-wearing-black-drinking-water-in-the-mountain-Stay-Hydrated-us-Feature-.jpg)

![Featured | Black and brown bow on grass field during daytime | How To Build A DIY Longbow [Video]](https://survivallife.com/wp-content/uploads/2016/06/black-and-brown-bow-on-grass-field-during-daytime-DIY-Longbow-px-Featured.jpg)
-
 Do It Yourself7 months ago
Paracord Projects | 36 Cool Paracord Ideas For Your Paracord Survival Projects
-
 Do It Yourself9 months ago
How To Make Paracord Survival Bracelets | DIY Survival Prepping
-
 Do It Yourself9 months ago
21 Home Remedies For Toothache Pain Relief
-
 Do It Yourself10 months ago
Survival DIY: How To Melt Aluminum Cans For Casting
-
 Exports8 months ago
Are Switchblades Legal? Knife Laws By State
Pingback: DIY Laser Guided Blowgun | Survival Life | Blog
Pingback: How To Make A Flamethrower | DIY Backpack Flamethrower Instructions from Survival Life
Pingback: How To Make A DIY Flamethrower
Pingback: How To Make A DIY Flamethrower - Survive!