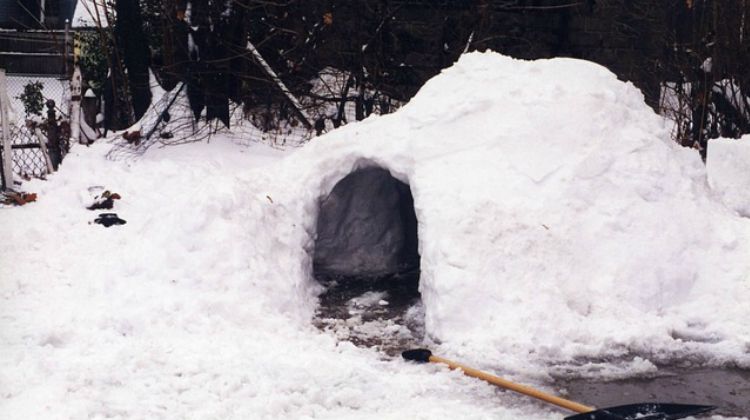


You never know when a winter survival situation may arise. Knowing how to build a survival snow shelter is a must – check out this post to learn how to build one that is strong, sturdy and durable.
How To Build A Snow Shelter Using Minimal Equipment
You just never know when a true winter survival situation may arise. Having the knowledge and skill set for this type of snow shelter is truly a must, especially if you live in northern climates with heavy snowfall. If built correctly, a snow cave will maintain a constant temperature of 32 degrees fahrenheit inside, no matter what the weather conditions are like on the outside.
Here’s an awesome tip: By simply lighting one single tea candle, the inside temperature of the snow cave can rise up to 40 degrees fahrenheit. I don’t know about you, but, that temperature sounds heavenly compared to, let’s say…10-20 below zero!! The reason why the temperature increase is possible is snow is mostly composed of trapped air and trapped air is what insulates. Back to the tea candle tip for a moment. It wouldn’t be a bad idea to pack a few with your winter gear!
Another plus is a snow cave can be built with minimal equipment.

Getting Started: Snow Shelter Tips
As with any survival situation, there are slight risks involved when constructing your snow shelter:
- Don't build a snow shelter in a location that could be wiped out by a landslide, avalanche, falling rocks, or falling trees.
- Hiding in a snow cave can prevent search and rescue from finding you. Consider a flag of brightly colored material to place on the outside of your snow cave. Make the flag an adequate size so it can be spotted easily.
- Snow shelters can also trap carbon monoxide/dioxide, particularly if you're lighting a candle inside. Poke a breathing hole in the roof that's a couple inches in diameter, then leave a stick in the hole. Shake the stick occasionally to keep that hole clear.
Selecting a Location

1. Find an area with deep snow. If you can find a snowdrift at least five feet (1.5m) deep, a lot of your work will be done for you. Look for areas where the wind has blown the snow against a slope. Keep in mind you'll also need an area large enough to house however many people you have. A ten foot (3 m) diameter cave is comfortable for two or three people.
2. Test the consistency of the snow. Light, powdery snow may be difficult to work with, and is more likely to collapse. Fortunately, snow tends to harden once disturbed, so if you have the time to pile it up and wait for it to harden, you will likely still be able to form it into a snow cave.
3. Check that you have the proper equipment. As for equipment, a small, compact snow shovel will make the snow cave construction much easier. A non-smoke producing light source is useful for overnight stays, but a candle or other small flame source can be used if you remember to create a ventilation hole. (A small, compact snow shovel is a great addition to your winter gear.)
No products found.
Hollowing Out the Cave

1. Pile up the snow if necessary. Unless the snowdrifts in your area are deep enough already, you'll need to shovel the snow into a pile at least five feet (1.5m) tall, and large enough to fit the number of people it will be sheltering. A quick way to pile up snow is to find a short slope and use your shovel to push the snowdrift down to the base of the slope. Beware of taller slopes with additional snowdrifts higher up, however, as your snow cave could be buried in an avalanche.
2. Pack the snow firmly. Pack the snow pile or snowdrift by stomping on it. Snowshoes work well for this or laying a plywood board over it and stomping on that. If the snow is light and powdery, you may wish to pack it down several times as you create the snow pile. In addition, you may want to do a final pack when the pile is tall enough.
3. Allow two or more hours for the cold air to harden your snow pile. This makes the snow firmer and will reduce the risk of the cave from collapsing in on you while you dig it out.
4. Dig a tunnel into the snow. If you made a snow pile, dig a tunnel wide enough to crawl through and several feet deep, sloping upward. If you are digging into a deep snowdrift, dig a trench 5 or more feet down for you to stand in, then dig a tunnel at the base of the trench. You may find this easier if you have a compact snow shovel.
5. Hollow out the dome of the cave. Shovel snow from the center of the pile or snowdrift out through your tunnel. Once you've hollowed out enough room for your whole body at the end of the tunnel, you can stay there and use your feet to push the snow through the tunnel. Make sure the ceiling of the snow cave remains at least 1 foot (0.3m) thick to minimize the chance of collapse. The sides should be several inches (8 or more cm) thicker than the ceiling. Try to make the floor of the cave higher than the entrance. This will keep the sleeping area warm as the cold air gathers in the entrance tunnel.
Finishing the Snow Shelter

1. In freezing temperatures, strengthen the cave by pouring water over the outside. If the temperature is below freezing and you have water to spare, pour water over the outside of the cave. This will freeze into ice and create a sturdier structure. Never pour water over the cave if the temperature is above freezing!
2. Smooth the inside roof and walls to prevent dripping. Scrape the walls and roof of the cave to make it smooth. Irregular, bumpy surfaces will drip water onto the cave floor, instead of directing water down the walls to gather around the edges.
3. Mark the outside of the cave. Use brightly colored material or conspicuously placed branches to mark the edge of your cave. This may help people find the cave and stop them from walking on the roof and causing a collapse. If you are in an emergency situation awaiting rescue, make sure the brightly colored material is visible from the air.
4. Create ventilation holes. Snow caves can become quite insulated from the outside air, especially if moisture from your breath creates an icy layer on the inside wall. To prevent suffocation, use a ski pole or a long object to create an angled hole or two at the slanting edge of the roof. Make sure this hole goes all the way through the roof. Because ventilation holes will cause some warm air to escape, you may wish to cover the hole with a snowball or other object, then remove it if the air feels stuffy or anyone feels dizzy. Remove the object before you go to sleep.

5. Cover the ground with insulating material. Gather pine branches to place on the floor of the cave, to slow the escape of warmth through the ground. You can sleep on camping pads but, be aware that inflatable pads may not keep you warm in cold weather.
And there you have it, folks – this is how to build a snow cave! My advice is to practice this beforehand (if possible) so you’re not in the freezing temperatures trying to perfect this skill while in a severe survival situation. Having this skill somewhat perfected BEFORE it may become necessary will save you time and energy in a true survival situation. It is important to remember that you can still build up a sweat in cold weather which puts you at a higher risk for hypothermia.
You can make it a fun family project! The kids will love it and they will learn a valuable survival skill in the process!
If you have had success with snow shelters or would like to share a tip, please share with us in the comment section below.

Want to learn more? Follow us on Facebook and Twitter for the latest survival tips and news!
Are you in need of some winter survival supplies? Check out these must-haves!
- For the ultimate tool for outdoor warmth and food preparation, check out this BioLite-CampStove!
- Light your way as you hollow out the inside of your snow cave with this Stow Bag 8 LED Headlamp.
- Never find yourself without a trusted lighter. This Everstryke Pro lighter won't let you down when survival is on the line.