Do It Yourself
Mothers Milk: Grow Your Own Vinegar
Last week I showed you 35 different reasons to keep and store vinegar in your supplies.
Click here to see the original article
The response to the article was fantastic but it really got me thinking…
What do you do when you run low on store bought vinegar and buying more is not an option?
The answer is simple; you make your own.
I have not done this yet myself but this is the most detailed information that I have gathered so far.
I have seen other versions that use brewer’s yeast, apple cider, and a myriad of other items. If you have a different recipe leave it in the comments; I would definitely like to see it and I am sure that others would as well.
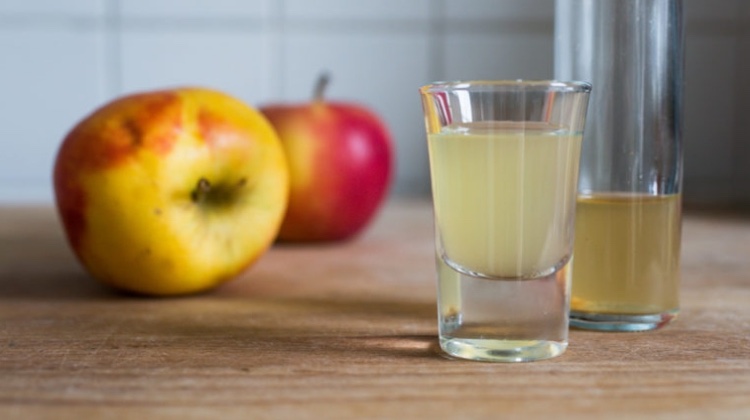
The first thing you need to do is to create your Mother of Vinegar. If you have ever purchased organic vinegar, odds are you have seen this clumpy whitish mass at the bottom of the bottle.
Never throw this out! This is an already thriving Mother of vinegar. If you have some of that on hand you completely cut out or at least get a huge head start on the first step.
If you are starting fresh just follow the steps below.
Ingredients:
Old wine still in the bottle with a cork, 16oz or so for the Mother, and more when you make your vinegar
Red wine or apple cider vinegar, a few tablespoons should be enough
Iodine, for sterilization
Storage container, ceramic or glass is preferred but NEVER use metal
Sterilized containers, for bottling your vinegar
Cheesecloth & rubber band
Ripe fruit, to feed your Mother
Optional: fine sieve, funnel, fruit juice
Make the Mother:
To make a Mother, take your leftover wine and add a splash (tablespoon) of red wine or apple cider vinegar. Re-cork the bottle and put it somewhere dark and warm to encourage the bacteria to attack residual sugar in the wine and start the fermentation process.
Temperature is not entirely crucial, but a stable and warm temperature around 70 degrees will usually yield better results. It takes about 2 months to fully grow your mother. No matter how much you want to take it out and look at it, be sure to leave the bottle alone otherwise your mother could fail.
Note: If for some reason it doesn’t work, or if you just don’t want to wait 2 months for maturity, you can buy Mother of vinegar premade, in a tub from a wine supply store.
After 2 months has passed, slowly pour the contents of the bottle into bowl. Mother, when ready, is not very pretty and looks a bit like something you might cough up after a bad cold…
There will also be some vinegar that has already started to form.
You can filter out with a fine sieve or coffee filter into another bowl to transfer to bottle Don’t throw any sludge away, this is your starter.
While not appetizing, it is not harmful; and can be used again and again to create more vinegar.
Feeding your Mother:
After you have created your Mother, you’ll need to feed so that it will produce a regular supply of vinegar. Transfer your culture to a storable container with a wide mouth, like a crock. Another good vessel to use is a glass beverage container with a spigot, like for iced tea.
In the container, combine your Mother with any left over fruits that are starting to go bad or have become over ripened— berries, apples, pears and pit fruits are all good choices, even tomatoes.
Just be mindful that whatever you add will contribute to the overall flavor,
Now add enough liquid (an inexpensive bottle of wine, or the dregs of the half-finished glasses of wine you’ve been saving in your refrigerator) to cover the fruit you’ve given the Mother. You can also use fresh fruit juices in addition to the wine. Store bought bottle juice is not a good idea as it has preservatives that inhibit fermentation.
The container needs to be covered to keep dirt and insects out but make sure that it can breathe. One of the easiest ways to do this is to lay a piece of cheesecloth over the mouth of the container and secure it with a rubber band.
Then put the mix in a warm dark place once again, checking on it every week. Continue to add liquid as needed.
A bit of scum will form on top as the process continues.
This just needs to be scraped off before you add more to the mix.
This, like the mother, is not harmful; it’s just the bacteria creating its own perfect environment.
Note: When you add liquid, your vinegar will be diluted until the bacteria can catch up, so if you’re in the mood for sharp vinegar, you’ll need to give the mix some time. I recommend tasting at 6 weeks and going from there.
Voila! Vinegar:
Once the vinegar has a taste that is to your liking it is time to bottle it.
This is where the iced tea container comes in very handy.
Pour from the spigot and bottle it in small, sterilized, airtight vessels.
If your container does not have a spigot, just ladle the vinegar out and strain it through cheese cloth before you bottle it.
If you don’t want the sediment, filter again with a fine sieve or coffee filter.
If you want to store your vinegar for long periods you will need to pasteurize it.
This is a simple process and all you need to do is heat it to 150˚F for a half hour in a clean pot — then you don’t have to worry about an airtight container.
You can also add fresh herbs to the bottles if you like. This will not only make your vinegar look nice, but infuse it with delicious herb flavors that make it perfect for marinating meats.
Your Mother will continue to work and grow as you add to it. At some point you’ll have more mother than room for vinegar.
You can scrape the extra Mother off of your container and start a new batch of vinegar or you can share it with your friends.
NATURAL HEALTH: Grow Your Own Medicine
How to Make a Tuna Oil Lamp
6 Easy Steps to Growing Wild Mushrooms at Home
-

 Do It Yourself7 months ago
Paracord Projects | 36 Cool Paracord Ideas For Your Paracord Survival Projects
-
 Do It Yourself9 months ago
How To Make Paracord Survival Bracelets | DIY Survival Prepping
-
 Do It Yourself9 months ago
21 Home Remedies For Toothache Pain Relief
-
 Do It Yourself10 months ago
Survival DIY: How To Melt Aluminum Cans For Casting
-
 Exports8 months ago
Are Switchblades Legal? Knife Laws By State
Vicki
January 24, 2013 at 9:13 AM
This is the recipe I got from GRIT magazine article. I tried it and it works. I have several jars going now and as one batch finishes I just start another. This requires no original “mother” and does not take much longer than yours. Hope this helps.
Wash, peel and core 5-10 (preferably organic) apples. Another nice thing is that there’s no set amount, you can make as much or as little as you want.
Place the peels and cores in a large glass or stoneware bowl and cover with water by an inch or so. Add 1/4 Cup of sugar for each quart of water you used and stir to mix thoroughly.
Cover the bowl with a heavy plate. The apple scraps need to be completely submersed in the water. Cover the whole thing with a clean kitchen towel and let sit for a week in a cool dark location. Between 65-85 degrees is a good fermentation temperature range, and be sure to keep it in a dark place, because UV light destroys the fermentation process.
The mixture will begin to bubble and foam as yeast forms. That’s normal and in fact by Day 3, I had bubbling!
When the week is up, spoon off any black mold that has grown. That’s also okay and will occur if the mixture isn’t kept cool enough, but if you keep the bowl in a cool spot you shouldn’t have any mold.
Strain out the apple solids and pour the liquid into sterilized canning jars, leaving about an inch of head room and discard the solids. Cover each canning jar with a square of doubled cheesecloth and screw just the ring part of the top on. (Hang onto the flat parts of the lids, you’ll need them later) This allows the yeast to ‘breathe’ and prevents the metal from corroding.
Store the jars on a shelf in your pantry and wait about six weeks. A film should start forming on the top. The is the ‘mother’. You can open up the jars and stir or swirl them so the mother settles on the bottom and more will grow on top.
After six weeks, replace the cheesecloth with the flat part of the lid and screw the ring back on. Stored in a cool, dark place, the apple cider vinegar will last indefinitely. By this point the yeast will have eaten all the available sugars and you will be left with a ‘shelf-stable’ vinegar. The flavor will develop and evolve over time.
Note: If you save some of the mother from each batch and add it to the next batch, the vinegar will be finished more quickly.
JJM
January 24, 2013 at 1:16 PM
Thanks Vicki – Good to hear from a sucessful user. From what I understand it is still somewhat an act of LUCK that the right bacteria finds your jar of makings to get the process going??
Barbara
February 1, 2013 at 5:04 PM
Those of us who make kombusha(Russians call it chai kvas) know that old kombusha IS vinegar. You can order the kombusha culture online if you don’t have a friend to give you one of their extra blobs. Then you feed the blob brewed-and-cooled tea with lots of sugar (instructions also available online). But one published author says that a friend of his stuck a blob into old fashioned soda pop and got a good tasting product, which also becomes vinegar if it is allowed to sit long enough.
Jim L.
May 11, 2013 at 9:32 AM
I would not add commercial wine because it contains sulfides. They are used to sterilize equipment AND kill the vinegar germ in the wine. Many people are sensitive to them.
I would stick to Apple or fruit ciders and brew them that way. They will make “Hard cider” first and then the vinegar yeast grows on the alcohol and remaining sugars the wine yeast can’t convert.
Vinegar Mother is a plague to organic wine brewers. Hence the need to use sulfides.
steven
May 11, 2013 at 11:24 AM
In most cases the aceatic bacteria is converting alcohol not sugar into vinegar. Most commercial red wine has little to no sugar left after fermentation. One thing that can be a problem is free, unbound sulphur dioxide addedm to the wine at bottling. It is a anti-microbial that is intended to STOP things like what you are hoping to have happen. The sulphur will bind with oxygen and aldehydes over time so its best to use wine that has been in bottle for at least two years. Or you can pour it into a bowl and wisk it to introduce oxygen and let it sit out overnight first.
Pingback: 35 Reasons You Should Never Be Without Vinegar - Survival Life