Food Preservation
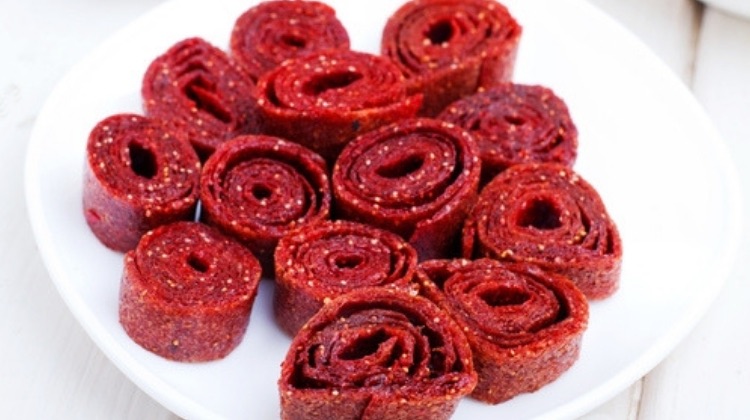
Homemade Fruit Rollups Recipe
One of my favorite lunchtime treats when growing up were the Strawberry Fruit Roll-Ups.
While they are delicious, the name is a lie!
You won’t find a single real strawberry on the ingredient list… Just, two kinds of corn syrup, partially hydrogenated cottonseed oil, and red 40 and pears from concentrate?
But no need to worry, you can make these in your own kitchen from three simple ingredients.
(We can say they are for the kids…. but I make them for myself 😉 )
1.strawberries
2.sugar
3. Lemon juice
These are simple to make, cost very little and are much healthier than the store bought brands.
Not only can you make these yourself and save a little bit of money, but you also know exactly what is in them.
Homemade Strawberry Fruit Roll-Ups
1 pound strawberries, hulled
¾ cup granulated sugar
1 tablespoon Lemon juice ( preferably fresh squeezed)
Yield: 12 5″x 5″ rolls (remember that you can scale this recipe up to make more!)
Cut the strawberries in half and give them a good mash with a potato masher or large fork in a large bowl. You should have about 2 cups mashed berries.
Stir in the sugar and lemon juice and allow it to sit at room temperature for a half hour. This will allow the acids to begin breaking down the berries .
Stir once or twice while they sit to dissolve the sugar.
Pour the strawberries and their natural syrup into a blender and purée for 1 minute, until the mixture is nice and smooth.
Pour into a high-sided skillet or pan and bring to a low boil over medium heat. The wider the pan the better, this will help the liquid evaporate quickly.
Cook for 20 to 25 minutes, making sure to stir often.
There are a few visual queues to look for when cooking the fruit:
-The liquid will foam, then clarify as the bubbles slow and the purée thickens.
-At the final stage, the purée will be consistently thick and almost opaque, and it will “mound” slightly instead of immediately seeping back when pushed across the bottom of the pan with a spoon.
Preheat your oven to 175˚F. Line 2 high sided baking sheets with parchment paper.
Divide the cooked fruit between the baking sheets and use a spatula to spread the mixture evenly into as thin and wide a rectangle as possible. The jam should be no more than ⅛ inch thick but still as evenly opaque as you can manage; thinner, more translucent spots will harden into brittle.
Heat in the oven for 5 to 6 hours, or until the fruit feels slightly tacky but no longer sticky. The timing will depend on the humidity level; high humidity will lead to longer cooking times.
Transfer the parchment to wire racks and cool completely then transfer the fruit leather to sheets of waxed paper large enough to leave overhang on all sides. Use kitchen shears or a pizza cutter to cut the fruit leather from each pan into 6 (5 by 5-inch) squares. Fold the extra waxed paper over the edges before rolling so they won’t fuse.
Enjoy!

Store the Roll-Ups at room temperature in an airtight container for up to a week.
While these may not last nearly as long as the store bought brands they are a much healthier alternative.
Oh! It doesn’t just stop at strawberries. You can use blueberries, blackberries, apples and all kinds of different fruits ( and tons of different mixtures too!)
These are the full sugar versions but I’m curious, has anyone tried to make these with splenda, sweet-n-low, or stevia?
Just a thought for friends that need to limit their sugar intake.
For more information on making your own healthy snacks, check out these articles:
DIY Dried Fruit
Homemade Corn Tortilla Recipe
You Asked For It: Nana’s Biscuits Recipe
-

 Do It Yourself7 months ago
Paracord Projects | 36 Cool Paracord Ideas For Your Paracord Survival Projects
-
 Do It Yourself9 months ago
How To Make Paracord Survival Bracelets | DIY Survival Prepping
-
 Do It Yourself9 months ago
21 Home Remedies For Toothache Pain Relief
-
 Do It Yourself10 months ago
Survival DIY: How To Melt Aluminum Cans For Casting
-
 Exports8 months ago
Are Switchblades Legal? Knife Laws By State
Karen
March 25, 2013 at 11:06 AM
I recently made a batch of strawberry and applesauce roll ups. I mixed strawberries and natural applesauce (check your ingredients to ensure no added sugar or preservatives) along with lemon juice to make a really great combination. There was only the natural sweetness of berries and apples. The lemon added some tang to it. The strawberry seeds added texture. It was enjoyable overall.
Tracy
March 25, 2013 at 2:42 PM
Karen, what are the ratios?
Al McLennan
March 25, 2013 at 2:40 PM
My brother has made “fruit leathers” for years so I got some feedback from him about the process and shelf life. His response is below.
“I have a dehydrator with circular trays that has an adjustable thermostat and a fan. It can operate with up to 15 trays. The air is circulated across the top of each tray and out through a center hole. (I think it is an American Harvester.) It works really well with for the 12 trays we have. We also have some flexible plastic tray inserts with a short rim that keeps liquids from overflowing. We use these to make leathers.
To make fruit leathers, we puree the fruit in a blender. If you want to add any special flavorings, this is the time to do it. The puree needs to be of a heavy consistency. We spread this over the plastic tray inserts to about 1/4″ thickness. It is usually dry in about 8 hours (overnight). To store it, we roll it into wax paper and store it in double zip-loc bags. Best if kept out of light, so we often put them in a paper bag. They would probably store better in mylar or HD vacuum bags (with O2 removed).
These leathers will keep for years. We still have some that are over 10 years old and they are still edible, though some flavor has diminished. Usual storage recommendation is for 2 to 5 years. The natural sugars in the fruit act like a preservative. Drying with low heat preserves the natural enzymes.
By the way, inexpensive hand warmers (with the dry ingredients) are actually the same as the oxygen absorbers you can buy for food storage, but they are much cheaper. I can get a 2-pack for $ .50 that are rated for 8 hours. They work great as oxygen absorbers in sealed mylar bags. Two hand warmers in a 5-gal. bucket are just fine.
Hope this info is helpful. Enjoy!”
Joseph Muhammad
March 26, 2013 at 3:13 PM
I would advise to use applesauce (as the first comment poster was talking about) for sweetener in place of sugar. The health research suggests the artificial sugars are ultimately far worse for your health than white refined real sugar. Cause cancer and other horrible things.
Jan Scriba
March 28, 2013 at 1:48 AM
Love the idea. AS you may know, white sugar is bleached. Probably another option may be what they call ‘coconut sugar,’ which is also granulated; and maybe the ‘jaggery,’ or another name for jaggery is, ‘rapadura,’ which is sold in Indian Food Stores, someimes in a block which you need to sort of chisel off a piece at a time, add water, and then measure according to you recipe; or it also comes in a bag, already granulated, would be healthful options. Because these are cinnamon-brown, they would no doubt affect the final outcome in looks, they would be more healthful varieties to try.
I have a question, also, not related to cooking, but to ‘survival, and am embarrassed to ask, but though I’ve seen pictures of these huge[looking ‘go bags,’ I’ve never seen them in department stores. Can you recommend where to buy these?
Thank you,
Jan Florida
Jan Scriba
March 28, 2013 at 1:51 AM
Is there any such thing as a ‘catalogue’ listing ‘probable survival gear stores for specific items?
Thank you!
Jan