Archives
How to Make Proper First Aid Kit
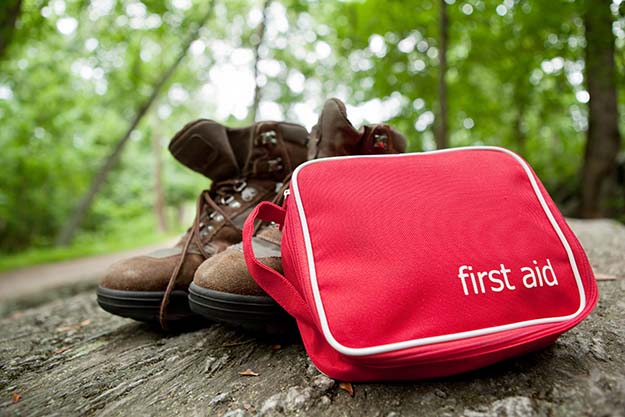
Wanting to build a first aid kit?
Not sure what all you should include?
Check out the fourth installment of our series on “Building a Target First Aid Kit.”
Building a Target First Aid Kit: Part 4
In earlier installments, we discussed what a first aid kit is and started to populate it with the first aid supplies.
In this part, we will continue to look at a number of other hopefully minor problems and the supplies appropriate for them. The numbers after the problem will be used as a shortcut to indicate for which problem(s) an item in the summary list is used for.
Sprains and Strains [7]
A sprain is a partial or complete tear of the ligaments resulting from a violent flexing of a joint, most commonly ankle and knee. The most common symptoms for partial sprains are pain and rapid swelling. A strain is severe stress on or a partial or complete tear of a muscle or ligament due to impact or excessive use, most commonly a hamstring, elbow or in the back. It’s common symptoms are pain, muscle spasms and weakness, as well as swelling in some cases.
The treatment for either can be remembered by R.I.C.E. That means to “Rest” the injury by staying off or not using it, apply “Ice” to keep the swelling down, “Compress” the joint or injury using an Ace elastic bandage or neoprene sleeve, and “Elevating” it above the heart to reduce swelling. For the Ice step, a cold pack would be appropriate. They are available in a number of sizes, such as 4″ x 5″, 4″ x 6″, 5″ x 6″, 5″ x 9″, 6″ x 9″ and others. There are some places advertising “instant cold wrap”, which appears to be an Ace-like bandage which cools. This would be ideal for sprains and strains, on the limbs at least – if it works. They tend not to say how it works, and the implication from the instructions is that it uses evaporation to cool. This might not be effective in a humid environment.
An anti-inflammatory like Ibuprofen or Naproxen is strongly recommended as an addition to R.I.C.E. To help with the Rest part, a crutch or cane can help with leg injuries for any walking which cannot be avoided, and a sling can help enforce “rest” for arm injuries. A rigid back brace is handy for back injuries, but won’t fit in most kits.

When I include a cold pack, I also try to include a S.W.A.T. elastic tourniquet. As a tourniquet, it is adequate if you have two hands to apply it with (see the article on tourniquets here, but as an elastic wrap to hold the cold pack in place, in addition to other uses, it is quite good. Alternatively, an Ace bandage can be used to hold on an ice pack.
If the person is unable to put any weight at all on the joint, it is numb or unstable, or they can’t use it at all, it may be a complete tear, and that is a serious problem often requiring surgery. These symptoms can also be an indication of a broken bone.
Eye contamination [8]
If you get chemicals in your eye, flushing with water or eyewash is your only option. An eye-wash station is best, but a hose streaming clean water will do quite well. Of course, this will be difficult to include in a first aid kit. In bigger kits, a bottle of eyewash (they come in 0.5 oz, 1 oz, 4 oz, 8 oz, 16 oz and 32 oz) is possible. The problem is, although the first two are fairly small and pack well, they don’t have much in them. The bigger ones have a decent amount, but take up a lot of space. By the way, don’t drink the eyewash no matter how thirsty you are; they may be 99% water, but that other 1% can poison you.
Getting “something (a particle) in your eye” is likely a fairly common occurrence, and in many cases, no first aid supplies are needed because the body is designed to handle it by producing abundant tears. If this does not work, perhaps the most effective treatment is the eye wash, in a stream to wash it out, or an eye cup to float it out. If eyewash is not available, there are a couple of instruments designed for removing objects from the eye. One is a magnet to attract ferrous metal; the other is a nylon loop to manipulate any solid which is non-magnetic. Often you can find both of these in a single two ended instrument. Alternately, a clean, wet cloth or gauze or cotton swab can sometimes be used to wipe out the object.

Note that if something is IMBEDDED in the eye, this is a serious problem. Do NOT remove it unless you know what you are doing.
A blow to the eye can be serious or minor. For minor cases, a cold compress can be applied to the eye.
For any eye injury which cannot be resolved as above, you want to immobilize and protect the eye until further treatment is available. Covering BOTH eyes with pads is the only way to even get close to doing this.
Hypothermia and Frostbite [9]
If a person is in a situation where heat is removed from the body faster than the body can produce heat, then at some point in time the body’s “core” temperature will drop below 95 degrees (Fahrenheit). This is known as hypothermia, and it is a killer. Having a thermometer is important to be able to monitor body temperature to spot hypothermia, as well as fever and other hyperthermia. The classic thermometer is a glass tube filled with mercury; not an attractive thing to have in your first aid kit. Digital thermometers are all the rage, and they are great, until they break, or the battery dies or leaks. The disposable liquid crystal strips from NexTemp may be the best choice for most kits.

The person’s body temperature must be raised or if it continues to fall, death will eventually result. Best is if the person can raise their own temperature after being removed or insulated from whatever is “stealing” their heat. A “space” blanket or bag (often called a bivy or bivvy sack) will reflect what heat they generate back at them, and can be fit into many kits. A fire can provide external heat and a way to warm liquids for internal heat. Other than this, support shivering or other intense physical activity by providing high energy foods. If the person can no longer produce their own heat, heat packs or hot water bottles in the groin and armpits can help, as can huddling with other people.
Frostbite is when parts of the body (most often in body parts farthest from the heart and those with large exposed areas) such as the toes freeze, and can be quite serious. Mild frostbite, usually called frostnip, only affects the surface of the skin and recovery is quite likely. Moderate frostbite damages the entire skin and usually causes blisters; recovery is fairly likely. Severe (deep) frostbite includes freezing of the muscles, tendons, blood vessels, and nerves. Without treatment, gangrene is likely, requiring amputation, or occasionally a frozen toe or finger falls off by itself. The obvious treatment is to warm the frozen part. But do NOT do this unless you are sure it can be kept warm; if refreezing occurs, much more damage will be done. The frozen part must be immobilized and treated very gently to avoid further damage from the ice crystals developed in the tissue. Applying heat directly or by radiation can cause burns. Body heat (space blanket), breath, and/or a warm environment are the safest ways to heat the frozen part. Immersing the part in a hot water bath can be effective, but has the risk of pulling down the body’s core temperature and/or causing heart problems. Ibuprofen can help with pain and inflammation.
Hyperthermia and Dehydration [10]
If a person is in a situation where heat is added to the body faster than the body can cool itself, then at some point in time, the body’s core temperature will raise above 99.5–100.9 degrees Fahrenheit (depending on which reference is used). Again, a thermometer is useful to monitor the body temperature.
This raise in temperature is EXTERNAL; that is contrary to the body’s desired temperature. This does NOT include an INTERNAL raise in temperature where the body raises its desired temperature past 99.5 degrees, which is “fever” (see Part 5 for dealing with this). The early stage is called “heat exhaustion” (or “heat prostration” or “heat stress”), with symptoms including heavy sweating, rapid breathing and a fast, weak pulse. In the later stage, called “heat stroke”, hot, dry, skin is typical. If the temperature gets much above 104 degrees Fahrenheit, death is likely. Obviously, the treatment is to cool down the victim; difficult to do out of a first aid kit; check to see what is available around you.

Generally paired with hyperthermia is dehydration, also known as hypohydration, which is not enough water in the body, with the accompanying disruption of metabolic processes. It can also result from vomiting, diarrhea, other illnesses or injuries, as well as water normally lost while breathing and sweating; it occurs whenever water out exceeds water in. Most people can tolerate a three to four percent decrease in body water without difficulty. A five to eight percent decrease can cause fatigue and dizziness. Over ten percent can cause physical and mental deterioration, accompanied by severe thirst. A decrease more than fifteen to twenty-five percent of the body water is usually fatal. Along with loss of water, it is likely that there has also been loss of electrolytes. The treatment is to replace the missing water and electrolytes. There is a whole class of “sports” drinks, such as Gatorade, which claim to do this. Certainly better than nothing, but they tend to have a lot of poor quality sugars in them, as well as dyes and chemicals which can be harmful long term or even block absorption or use of the electrolytes short term. Water is the basis of rehydration, in conjunction with an electrolyte replacement, either added to the water or as a tablet. Hammer Endurolytes Fizz and Medique Medi-Lyte are examples of tablets, while Emergen-C ElectroMix is an example of a pre-made mix. If course, you can make your own from recipes found online.
Shock [11]
Often, when injured or ill, the body goes into “shock”. When a person is in shock, his or her organs aren’t getting enough blood or oxygen. If untreated, this can lead to permanent organ damage or even death. Treat the injury or illness, lay them down with legs and feet elevated slightly, don’t let them eat or drink anything unless necessary to treat the causing injury or illness, cover them with a blanket if necessary to prevent chilling, monitor for vomiting or bleeding from the mouth to prevent choking, or for cessation of breathing and/or pulse.
Choking, Cessation of breathing or pulse [12]

Choking is handled with the Heimlich Maneuver if the victim is conscious and a similar technique if unconscious. These should be taught in any first aid or CPR course.
An illness or injury can cause a person to lose the ability to breath or even circulate blood. This can also be caused by drowning or electrical shock. The answer is to breath for them (artificial respiration) or circulate their blood for them (Hands Only CPR) or both (classic CPR). Using a CPR mask will help protect you from any illness they may have, or if they should vomit during the process.
Stocking the kit
In part one, we discussed how to figure out WHAT to put in the kit. In the following parts, we have come up with a number of possibilities for kit contents. We need to start thinking about HOW we are going to put the items into the kit. After all, there are likely two conflicting goals we have: to get everything in, and to be able to easily and quickly get any item or set of items out. The first goal is usually satisfied by putting in the biggest item, then the next biggest and so on, then fill in all the nooks and crannies with the little stuff. This tends to be a “random distribution”. The second goal is best satisfied by having every item in its own pocket or compartment, with all related items grouped together. This tends to not be an efficient use of space. Obviously, a compromise is usually necessary.

Probably the best kit container is a roll, with pockets, each pocket containing all the items needed for a particular treatment, and/or a number of related treatments. In this case, we don’t have that. We are using the case that started this project. It has fixed “X” and “Y” dimensions, and a “Z” dimension with a relatively limited range. One side has a fairly useful arrangement of pockets and the other side has one big pocket. Not perfect, not the best, but adequate. The arrangement tends to encourage small things on one side and big things on the other, so grouping items is fairly difficult. Furthermore, the bigger the pocket, the more likely stuff in it will get “mixed up”. We can improve the latter situation by putting things in Zip-Lock bags. You can get pretty much any size Zip-Lock bag you want from eBay, at quite reasonable prices (might as well get 25 or 50; it doesn’t cost much more and you can always use the extras for other things). For the kit I am building, gallon sized freezer Zip-Lock bags are just the right width for big divisions, and 2″ by 5″ bags fit into the pockets well, and are the exact right length for our instrument pack.

Cold packs are big and fairly heavy, because they have a pouch of water inside. One trick to fit cold pack(s) where they won’t fit is to “field strip” them. That is, open the pack, remove and discard the water pouch, and repackage the rest into an appropriate sized heavy-duty Zip-Lock bag. Measure the amount in the water pouch before discarding it, so you know how much water is needed. To use, just add the appropriate amount of water, seal and shake.
Since we can’t completely group items in this particular kit, we need to do the next best thing – provide a map. This can be just a list specifying “where” each item is; I prefer a picture with labels.

Summary of these
My contents list to cover this (* indicates part of the sale)
[The number under “Uses” refers to the number(s) listed after the problem(s) to indicate which are addressed by the item]
| Part of Sale? | # | Item | Alternatives (Notes) | Uses |
| yes | 1 | Up&Up 5″ x 7″ Cold Pack | or other size | 7, 8 |
| 1 | S.W.A.T. Tourniquet | (Can be replaced with an Ace bandage) | 7, 20 | |
| 0 | Ace Bandage | (Too big for my case) | 7 | |
| 4 | Medique Ibuprofen 2 x 200mg tablet packet | or Naproxen | 7, 9, 15 | |
| 1 | Honeywell Eyesaline Eye Wash, 1 oz | or 4 oz or bigger | 8 | |
| 0 | Eye cup | (Too big for my case) | 8 | |
| 2 | Medline 3″ Sterile Swabs, 2 pack | or 6″ sterile swabs | 8 | |
| 1 | DDP Eye Magnet/Nylon Loop | 8 | ||
| 4 | Walgreens Adhesive Eye Patch | or gauze eye pad | 8 | |
| 8 | NexTemp disposable thermometer | or plastic non-mercury thermometer | 9, 10, 13 | |
| 2 | M4040 Space blanket | or two person or emergency bivvy | 9, 11 | |
| 0 | Chemical heat pack | or hot water bottle (Too big for my case) | 9 | |
| 2 | Medique Medi-Lyte | or O.R.S. or mix or solution | 10 |
In this list, the items are fairly comprehensive, but some of the numbers are a bit small since I spread the products purchased over 4 kits. Adjust the numbers to your preferences and situation.

So far, we have considered first aid for problems primarily resulting from external events. Check out Part 5 for first aid for internal problems/illnesses, first aid for which is limited to medications.
First Aid Kit List
Must-Have First Aid Kit Contents
The Ultimate Emergency First Aid Kit List And Tips


-
 Do It Yourself7 months ago
Paracord Projects | 36 Cool Paracord Ideas For Your Paracord Survival Projects
-
 Do It Yourself9 months ago
How To Make Paracord Survival Bracelets | DIY Survival Prepping
-
 Do It Yourself9 months ago
21 Home Remedies For Toothache Pain Relief
-
 Do It Yourself10 months ago
Survival DIY: How To Melt Aluminum Cans For Casting
-
 Exports8 months ago
Are Switchblades Legal? Knife Laws By State
Pingback: Bargain Bin Survival: 18 Amazing Pieces Of Dollar Store Survival Gear
Pingback: Extreme Survival: Staying Alive In A Post Apocalyptic Environment
Pingback: 18 Survival Gear Items From The Dollar Store - Survive!